
Time needed: 10 minutes.
In this guide, we’ll go in-depth on how to use the Pix-Star web dashboard with a simple and practical 8-step guide. You’ll learn how to get your new frame registers, what features & functions are available, how to view photos from social media, how to manage all of your photos, much more.
By the time we’re done here, you’ll have a clear understanding of Pix-Star’s web dashboard, and how to use it to get the most out of your Pix-Star experience. Sharing precious moments & memories through photos, videos, and audio will be easier than ever before. You’ll also be able to include your grandparents in a user-friendly & effortless way and make sure that nobody in the family ever misses another important moment. Let’s dive in!
- Register your new Pix-Star frame

The first step in learning how to use the Pix-Star web dashboard is to get your new Pix-Star frame registered. If you’ve just bought a new Pix-Star frame for your home & family, or as a gift, it needs to be registered on the web interface to use features like cloud storage, the remote-control feature, and web albums.
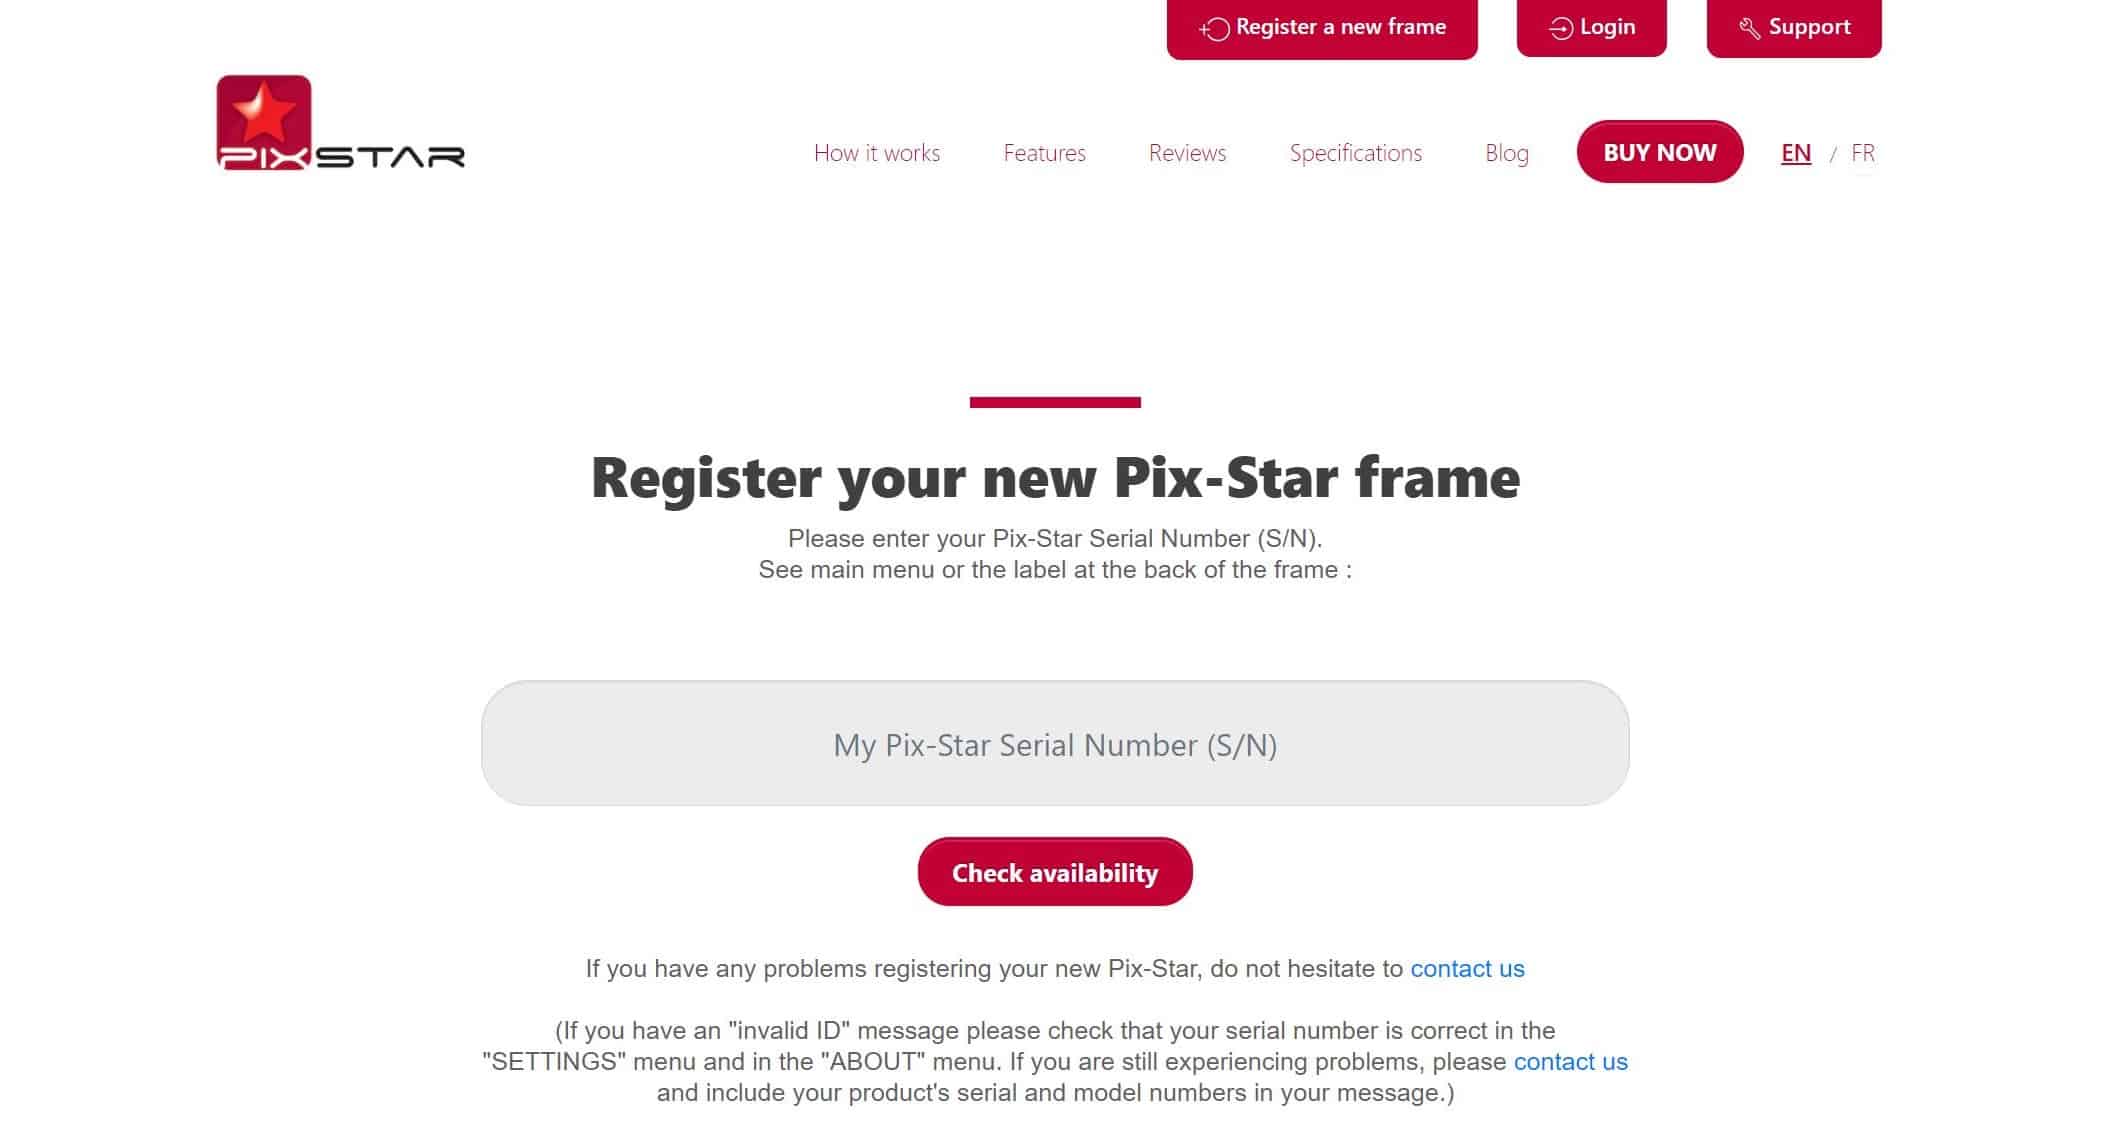
To register your new Pix-Star frame, head over to pix-star.com and click on “Register a new frame” at the top of the window. Follow the on-screen requirements to register your frame. Note that you can find your frame’s serial number in the “About” section of your frame’s “Settings” page (on the frame).
If you have already registered a frame, and want to register several frames to the same account, you can use the same process. You’ll be granted access to a multi-frame control account feature when you purchase two or more Pix-Star frames. It’s easy to set up and lets you control several Pix-Star frames at the same time from one user account, from anywhere in the world. - Login into your Pix-Star frame’s web dashboard

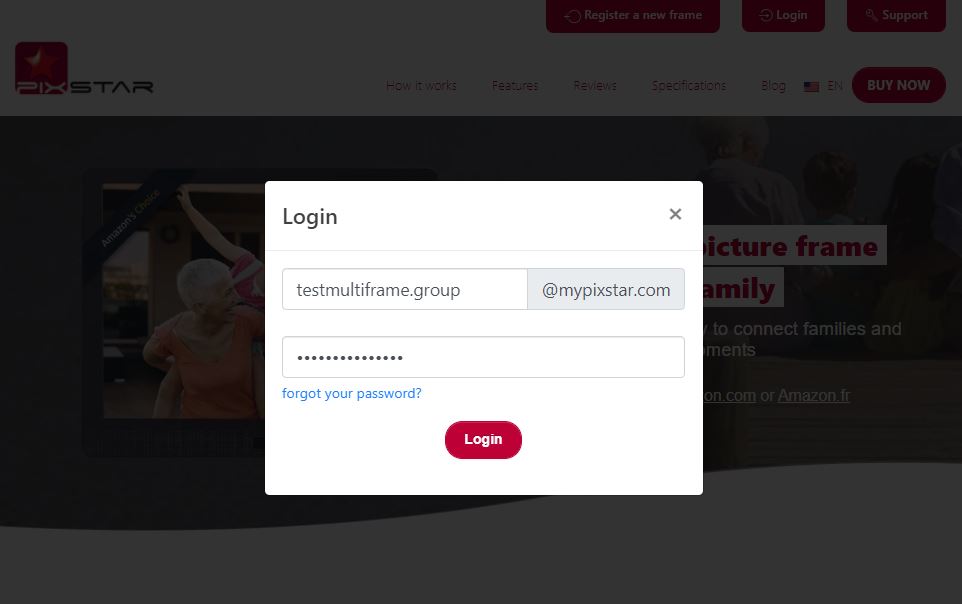
Once you’ve registered your frame, you’ll see its name (or unique email address) at the top of the window near the “Register a new frame” button – back on the pix-star.com page. You may need to click on the “Login” button on the right side if it’s your first time logging in to the web dashboard for a newly registered Pix-Star frame.
If you click on this name or email, you’ll be taken to your frame’s web dashboard. Note that you have to input your login information, which consists of the unique email address you created when registering your frame, and the password you assigned.
When you arrive at your frame’s web dashboard, take a couple of minutes to get familiar with the layout of the options, controls, and settings. Head over to the “My profile” section at the top right corner of the screen and make sure all your information is correct.
In the center of the top area of the web dashboard, it says “My Pix-Star is:”, followed by either “Online” or “Offline”. Your frame needs to be online with a green dot for any changes, synced photos, news updates, etc., to be reflected on the frame.
The same is true for multi-frame control groups. To ensure your Pix-Star frame is online, make sure it’s been connected to Wi-Fi (note that you can’t connect to any networks that require web browser authentication – as you often find with hotel & restaurant Wi-Fi networks). Also, make sure that you’ve registered your frame via the web interface (as in step 1 above). - Check your inbox & manage contacts
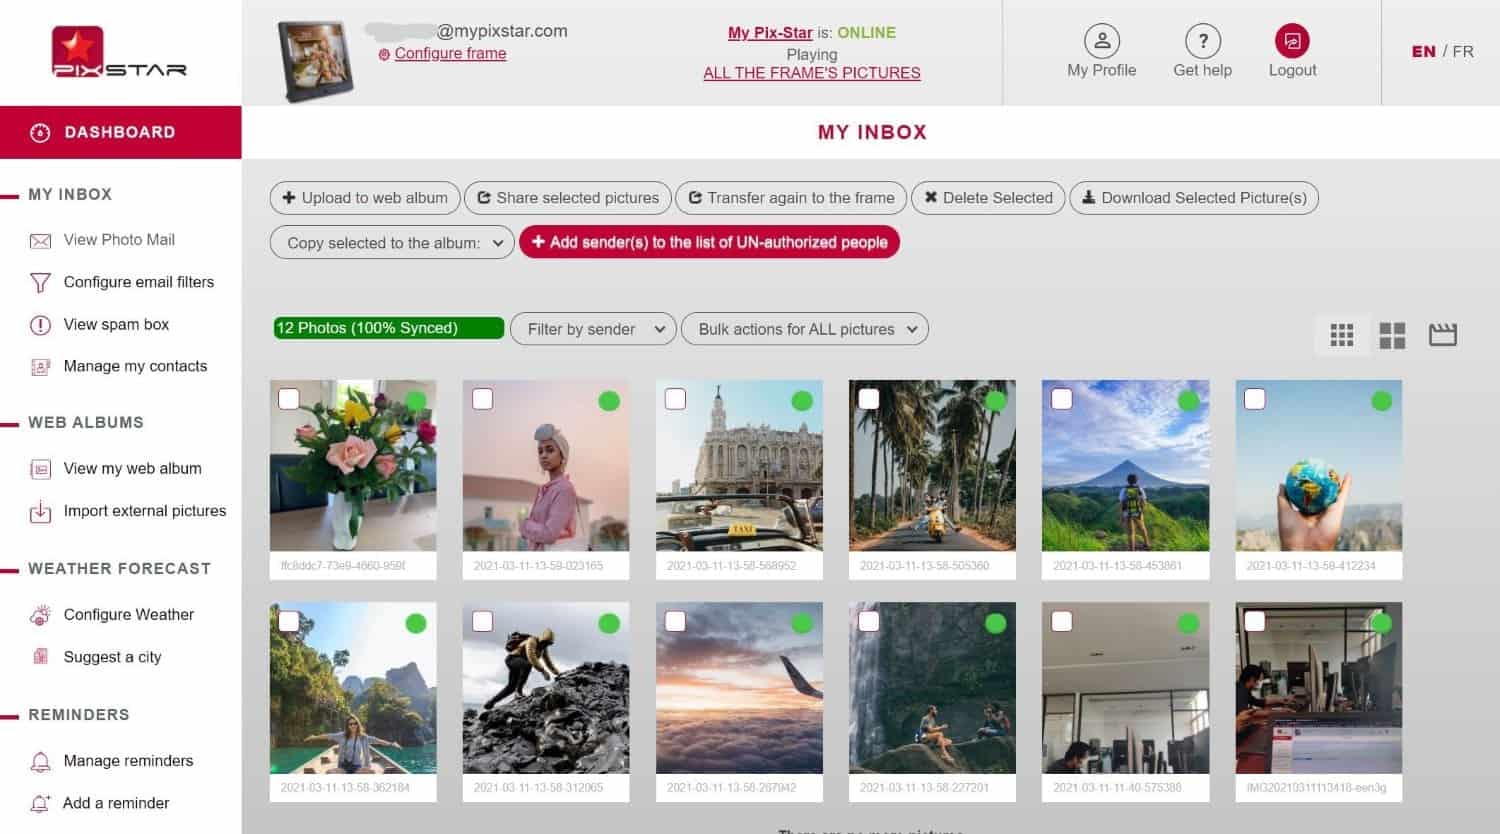
Under the “My Inbox” heading in the left-hand panel, there are four options. “View photo mail” lets you view photos sent to the frame via the Pix-Star Snap mobile app, or via the photo-mail function. You’ll see all the photos & videos listed as picture tiles with a bunch of options near the top of the window.
You can use these options to select & share photos with other Pix-Star frames, share them to your frame again (in the case you deleted the photos from your frame’s internal storage), delete specific photos, and even start a slideshow with the selection.
Photos & videos that have been already linked to and saved to your frame’s internal storage will have a green dot. This makes it easy to track which photos are currently on your Pix-Star frames, and which have yet to be synced. All of the photos you see in this section have been automatically backed up to the cloud. Any deletion made from here will subsequently remove them from the cloud, as well as your frame’s local copy.
Under the “Configure email filters”, you can set your frame to accept all photos ONLY from specific email addresses, or refuse photo-mail from specific email addresses. You can create a blacklist of addresses that you don’t want to be able to send photos to your frame. Any photos sent after blacklisting an email address will show up in the “View spam box” section. You can also add emails to your contact list under the “Manage my contacts” heading. - Link, update, view, and manage web albums
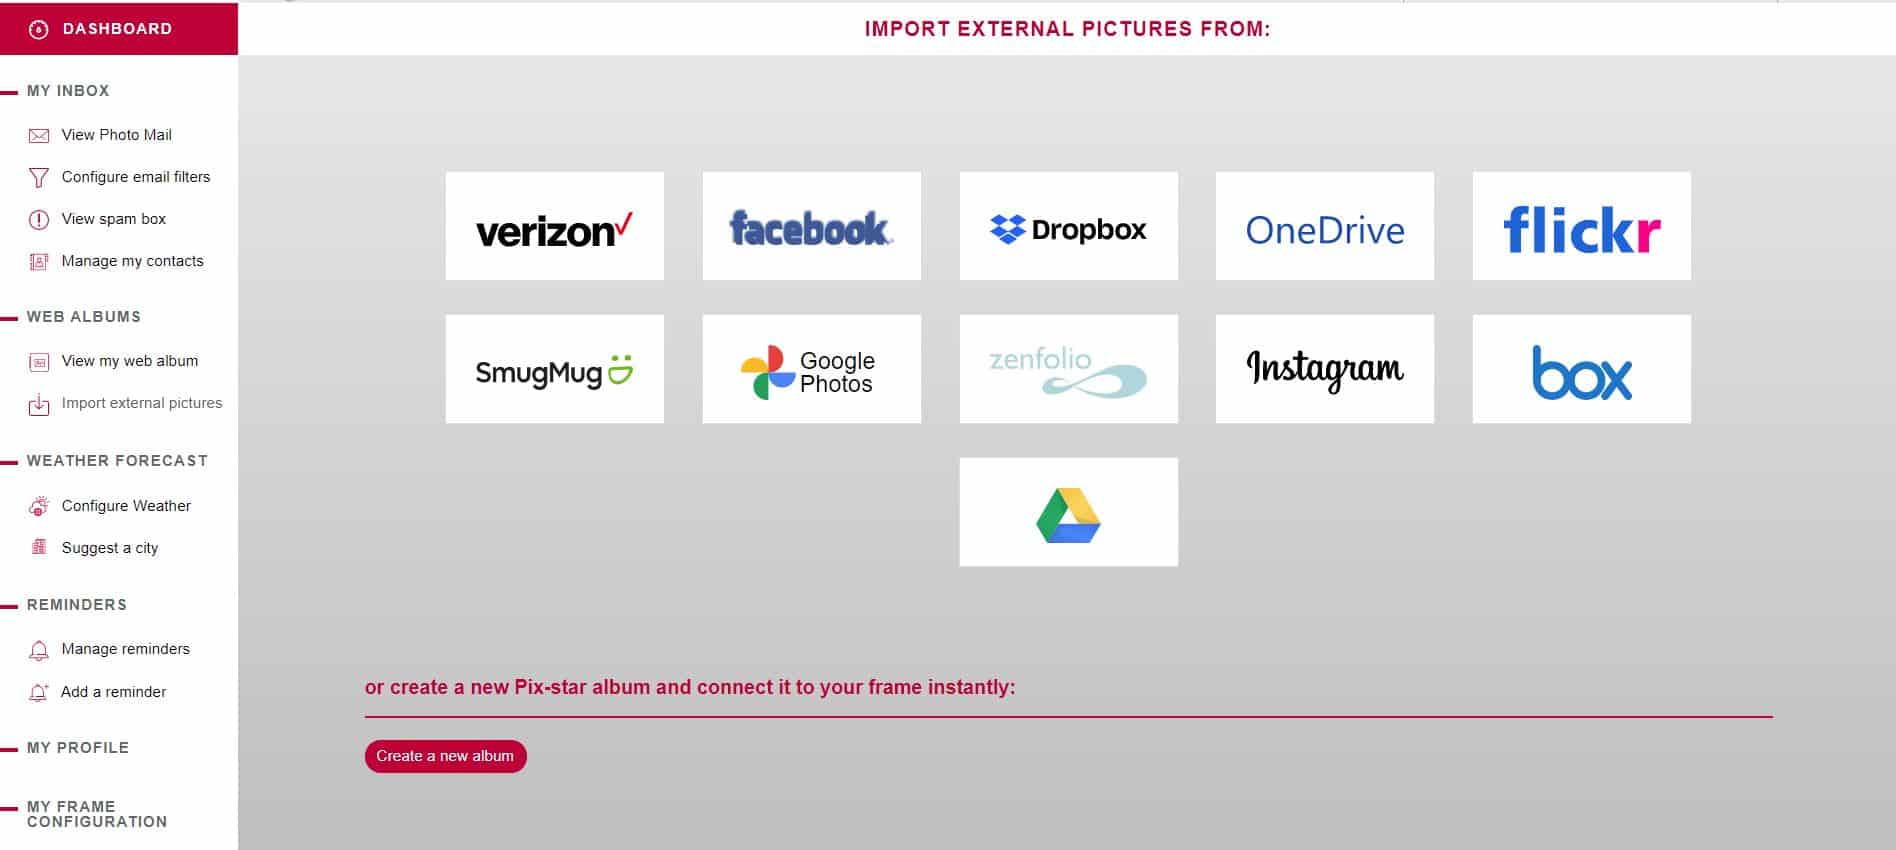
An important part of learning how to use the Pix-Star web dashboard is its web album support. It’s a unique feature that Pix-star arguably does the best. “Web albums” is the name for photo albums that are saved on social media, photo-sharing, and online storage platforms. Pix-Star supports almost a dozen platforms including Facebook, Google Photos, Instagram, Flickr, Google Drive, Dropbox, and more.
Through the web dashboard, you can import photo albums from any of the supported platforms, directly to your frame, and have them automatically saved to its internal storage. Locate the “Web albums” section in the left-hand panel and click on “View my web albums”.
Here you can see any previously linked web albums, you can force update them, create new albums, and even download them directly to your computer. Additionally, you can share them with another Pix-Star frame, making it much easier to make sure everyone in the family gets all of the new photos.
Under the “Import external pictures” section, you can link & sync new web albums. Click on it and select the platform you want to link photo albums from. You’ll need to put the login details in when requested (you can link to any profile that you have the login information for). Select the albums you want to sync then click on the “Link to frame” on the right side of the screen.
Alternatively, you can link & sync photo albums directly from your computer to your Pix-Star frame. Click on “Create an album” at the bottom of the platform selection page, type in the name you want to give the album and click “Create”. On the next page, you can drag-and-drop or browse through your computer’s files to link albums.
An important point worth noting is that Pix-Star’s web albums can be set to automatically update whenever new photos are added to the album. This is a great way to automate photo-sharing with all other connected Pix-Star frames. You only have to upload the photos to the linked albums on the linked platform, and they’ll be automatically downloaded & synced to all linked Pix-Star frames. - Remotely configure your Pix-Star frame
You can learn how to use the Pix-Star web dashboard without learning how to remotely control your frame. This doesn’t refer to using the handheld remote that comes with each Pix-Star frame, but rather by controlling your frames remotely via the web dashboard from anywhere in the world. It’s one of the most versatile digital picture frame features on the market and an essential feature for families & elderly users (or non-tech-savvy users).
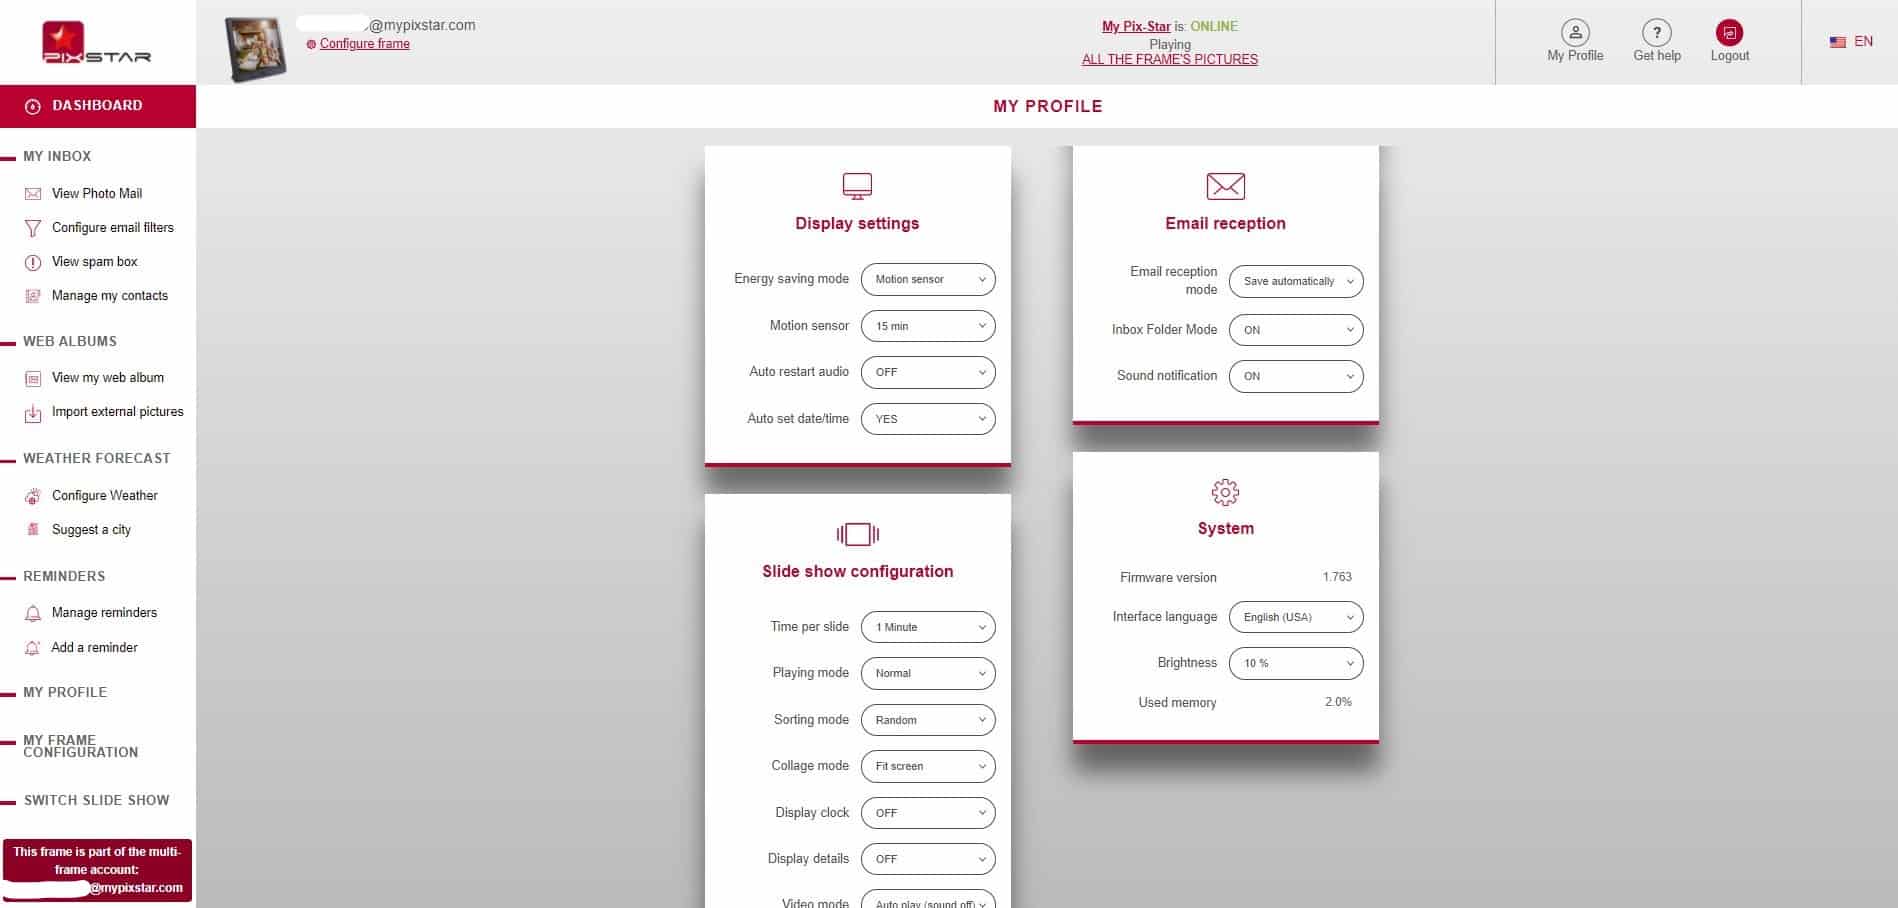
Locate and click on the “My Frame Configuration” in the left-hand panel. You’ll be taken to your frame’s remote-control dashboard. Here you can adjust most of your Pix-Star frame’s settings, start slideshows, manage local & cloud storage, change email reception settings, change slideshow sources, change the interface language, adjust brightness settings, and much more.
Take a couple of minutes to through the supported remote-control functions and give them a test. If this remote-control page doesn’t load, it’s likely that your Pix-Star frame isn’t online and needs to be reconnected to the internet. Alternatively, you can reboot your frame (by turning it off and removing & plugging it back into the power supply) and let it start up again.
Pix-Star’s remote-control feature is probably the best executed on the premium digital picture frame market. It’s easy to use, versatile, and lets you make sure that any connected Pix-Star frame gets (and shows) the desired photos & videos, exactly when you want them to. It’s an extremely helpful feature for grandparents as they don’t need to lift a finger to view all the latest photos – and nobody in the family will miss importantly updated again! - Create & manage multi-frame control groups
Pix-Star is unique in that you can manage & control up to 25 connected Pix-Star frames from a single user account. If you choose to buy more than one Pix-Star frame, you’ll be able to add all subsequent frames to a multi-frame control group. When logging into your account via the pix-star.com web interface, make sure to input the login details of the multi-frame control group.
Note that you don’t have quite as many customizations and remote-control settings available – though it’s still an extremely versatile way to control & manage all of the frames in the family. You don’t need to log out and re-log into each frame to adjust settings or manage storage. It’s a great way to save time and reduce the frustration of sharing photos with several frames at the same time remotely. - Switch slideshows from anywhere in the world
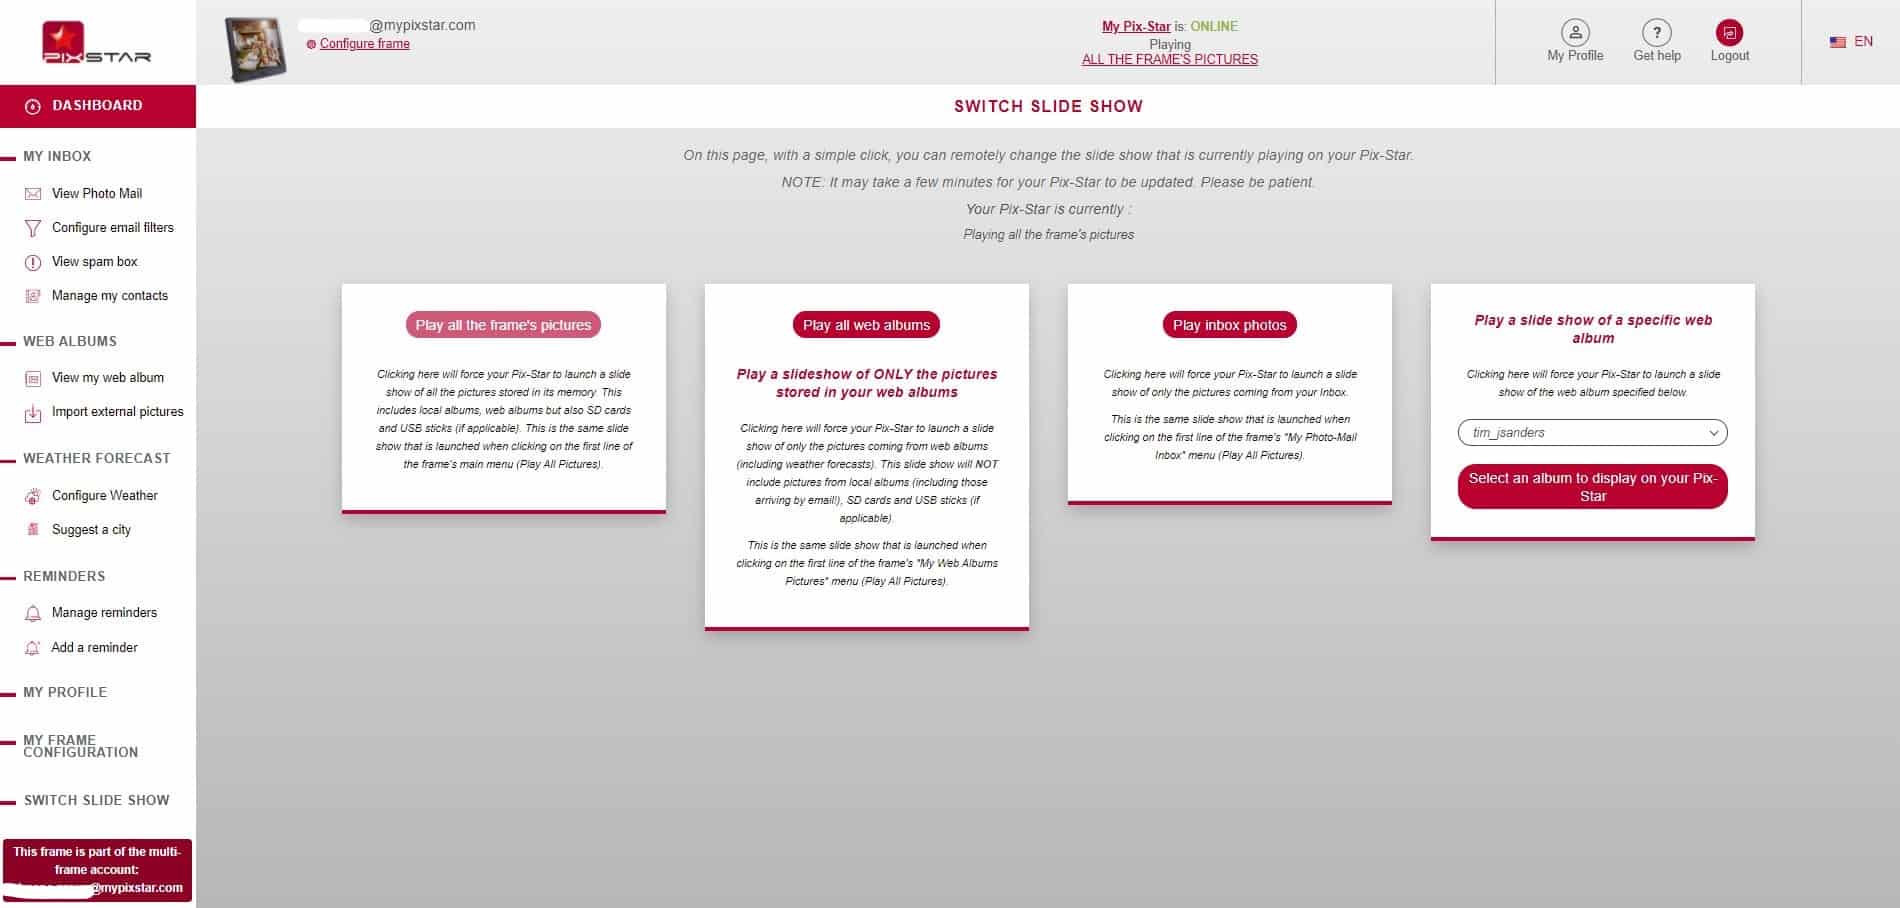
One of the most useful things you’ll learn from how to use the Pix-Star web dashboard is the slideshow switch function. Here you change a current slideshow to show pictures from various sources such as web albums (you can choose which web albums), photo-mail, custom albums, and much more.
In the left-hand panel of the web dashboard’s home page, find and click on “Switch slide show”. Make sure your Pix-Star frame is powered on and online, or you won’t be able to access the slideshow switcher. You’ll be taken to a new page where there are four options to choose from.
The first option is “Play all the frame’s pictures”. It has the same effect as selecting the “Play all pictures” from your Pix-Star frame’s home page (directly on the frame). Clicking on this option will play a slideshow containing all of the photos saved on the frame’s internal storage. This included linked & saved web albums and any connected USB/SD card that’s loaded with photos. Note that the slideshow settings (play order & frequency) will still take effect on this general slideshow.
The second option is to “Play all web albums”. This will play a slideshow that contains ONLY the photos that have been imported as web albums. It doesn’t matter how many different platforms – or how many profiles on each platform –have been linked & synced to the frame, they’ll all be played in this slideshow.
The third option is to “Play inbox photos”. Much like the “Play all web albums”, this slideshow will only play photos that have been sent to the frame via the Pix-Star Snap mobile app or the photo-mail feature. Web albums and photos from connected USB/SD cards will be ignored. Note that you can manually move photos to this photo-mail folder beforehand, giving you enhanced personalized and more control over which photos are played.
The fourth and final option is to “Play a slide show of a specific web album”. There’s a drop-down list of all synced web albums, from which you can select one to play. Once selected, the current slideshow will be overwritten and the specific web album will start playing. - Configure weather forecasts & set reminders
The final step in learning how to use the Pix-Star web dashboard is settings alerts & viewing weather forecasts/reports. These two features are less commonly used, but you should take some time to get familiar with them.
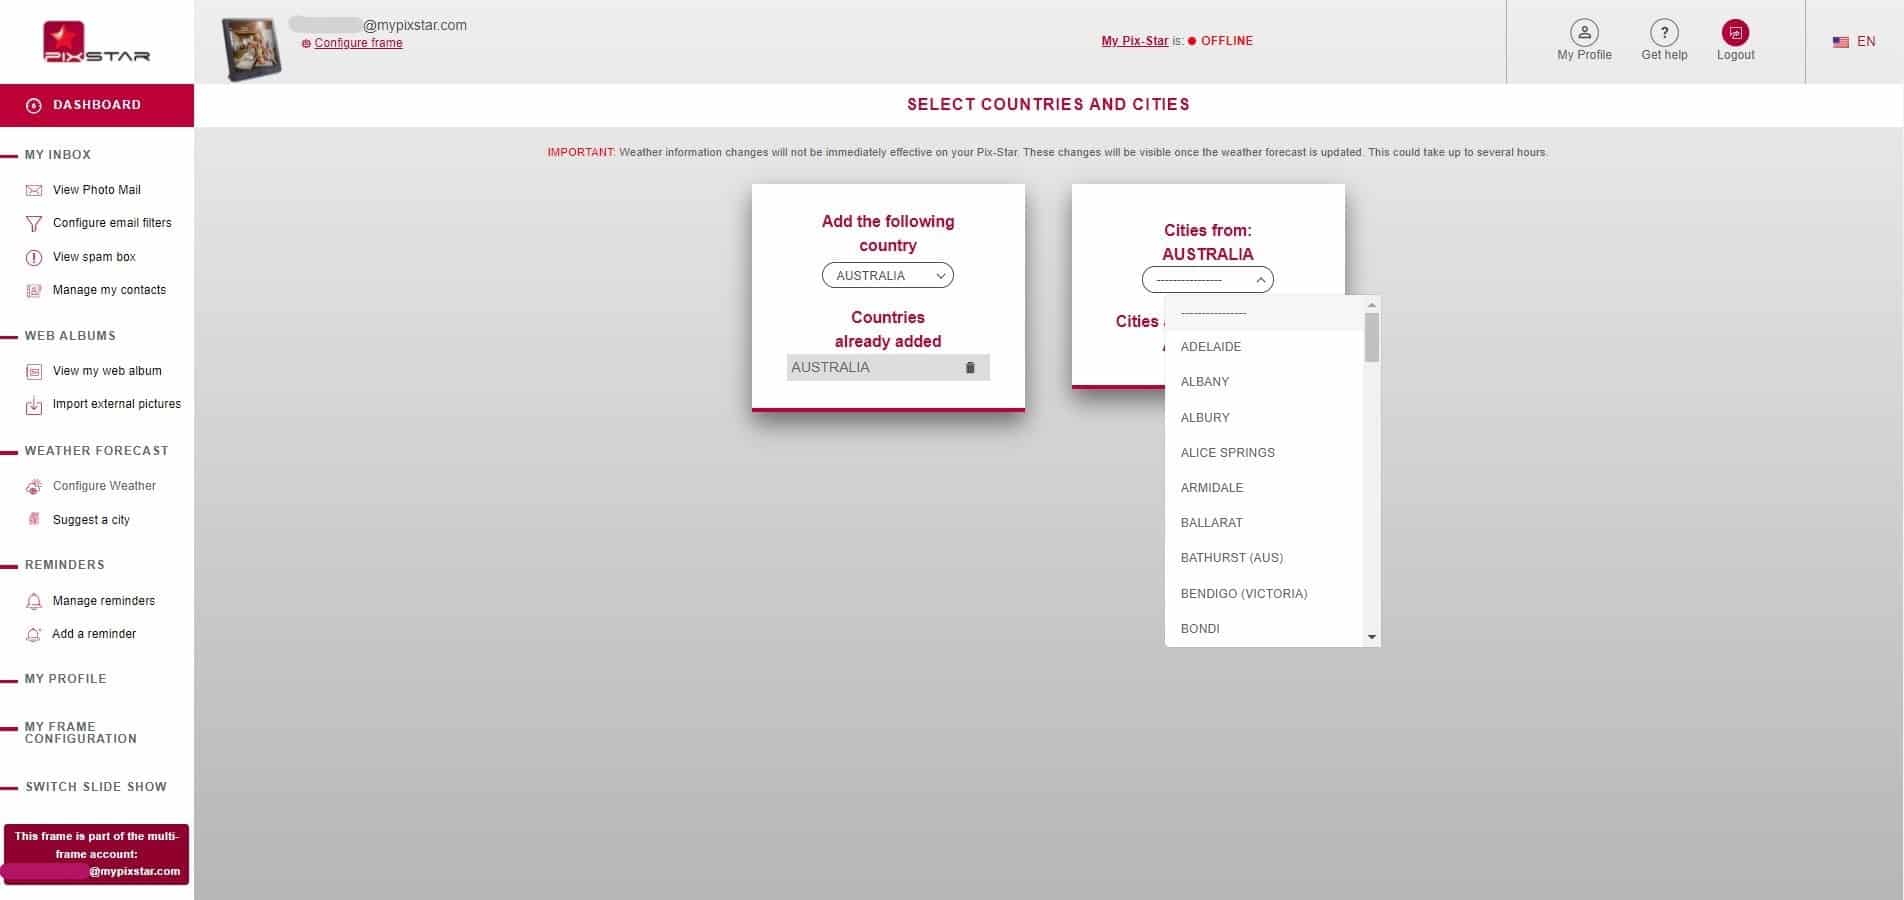
Note that weather forecasts are displayed as slides (like photos) within slideshows. You can select which country and city to provide forecasts & reports from, though they aren’t strictly up-to-the-minute live updates.
The “Add a reminder” feature lets you set reminders using a calendar function. these reminders will sound on the frame and pop up as a notification. You can customize the sound and type to get a more personalized reminder. You can also add notes to the reminders to provide a little more information with each alert.