FAQ
Your digital photo frame questions, answered.
Find quick answers about Wi-Fi, sending photos, web albums, slideshows and more. Browse the tutorials · Contact support
Getting started & account
When registering your Pix-star frame, you choose your custom frame email address to send pictures to your frame.
This email address looks like myname**@mypixstar.com**
Until July 2024, it worked also if you replaced the e-mail domain @pixstar.com instead of @mypixstar.com. This is no longer accessible, as the real address (for all Pix Star users) has always been “@mypixstar.com”.
If you have problems sending pictures by email to your frame, use @mypixstar.com and you’ll see that it works.
Regards,
The Pix-Star team
It’s now possible to manage all your family’s Pix-Star frames from one SINGLE account!
We call this a “Multi-frames account”.
Log in one of your frame’s account at Pix-Star.com you will see at the bottom left a new button called ” multi-frame account”, click here and you can create a new multi-frame account. Once created, you can add all your other Pix-Star frames and then, from one SINGLE account manage all the photo-mail pictures, web album, external album…
There will be ONE UNIQUE email address created for all the frames (in addition to their unique individual email address they already have) and then you can ask your friends and family members to send pictures to this Multi-Frames account’s email address, the photo mails will be dispatched automatically to each frame!
Same for web albums, when you create a Pix-Star web album inside the multi-frame account they get automatically to each frame account, including external albums from Dropbox, OneDrive or SmugMug.
Many of you were waiting for this feature, it’s now online!
If you have any question about this feature do not hesitate to contact us by email.
Enjoy your Pix-Star!
When a new software is available for download to your Pix-Star a message automatically pops up in BLUE collar at the bottom of the main menu ” SOFTWARE AVAILABLE! “.
This notification shows up automatically.
To download this new software version, click on this notification/button and the download will start immediately.
Installation is fully automatic, no other steps are required.
Hello,
May be you have an old pix-star that you are now replacing by a new one, or you are changing from a 10 inch to a bigger size (15 inch), or we sent a new unit to you under warranty to replace your old one?
So now you want to update your pix-star.com account so that it connects to the new frame. No problem, the process is very easy!
First of all, MAKE SURE NOT to register the new unit otherwise you cannot use the serial number to replace the old one in the old account!!!!!
Go to:
and log in your old account.
Once logged in, at the upper part of the screen click on:
MY PROFILE
Then once in the MY PROFILE page shows up, replace the old serial number by the new one to update.
(MAKE SURE you enter the NEW serial number CORRECTLY, it is 12 digit long!!!)
Click the button just below the serial number area to change it and confirm on the next pop up.
Done!
The Pix-Star Team.
Hello,
Please provide us with the following information:
– the serial number of the frame, 12 digit as shown on the label at the back of the unit.
– a CLEAR picture taken of the that label.
we will delete the account for you.
PLEASE NOTE that ALL pictures inside will be deleted.
Enjoy your pix-star!
To change your Pix-Star frame email address proceed as follow:
– log into your pix-star.com account.
– inside, at the top of the web page click on:
MY PROFILE
– on the next web page that shows up you see in the middle a zone where the frame email address is showing up.
– directly change the email address of the frame inside.
– click on the button below the email address to apply the change.
REMARKS:
Our system will first check whether this new email address is available or not (it may be already used by another user).
Also special characters are NOT allowed in an email address, so make sure not to enter any.
!!!
Once you have changed the frame email address do not forget that your user name to log into the www.pix-star.com account is then also changed
So next time you log in make sure to use the new email address as the user name (the left part of the ” @ ” in the Frame email address)
!!!
Thank you.
The Pix-Star Team.
Once you’ve switched on your new Pix-Star 2 steps are important to have it fully working:
1- configure the Wi-Fi connection to your Wi-Fi router. This is done either through the start up wizard that shows up at first use or through the Change Settings menu, then Wi-Fi menu.
2- register your Pix-Star by going to www.pix-star.com and pick up a dedicated email address for your frame. This email address that you can choose is hosted by us, it’s something like [email protected], you can choose the left side of the email address (the ” XXXX “).
And that’s it!
This should not take more than 5 minutes and you can start sending pictures to your Pix-Star frame by email, display your Dropbox, OneDrive or SmugMug web albums, play your favourite web radio, etc…
You may download the latest User Manual (multilingual) from this link:
https://www.pix-star.com/frontend/manuals/userguide.pdf
Should you have any further queries or questions that you don’t find answers in this user manual do not hesitate to contact us through our web site help and support page, we will help you.
Since the first product was launched a few years ago, Pix-Star has been using a very unique approach to simplify the use of a wireless product by computer savvy people by combining the product with a dedicated web site account so that the frame can be easily controlled over the internet.
This approach allows for example other members of the family to assist each others to manage the content of the frame or its configuration.
Till recently only a limited number of parameters could be controlled over the Internet. We have now extended this list to the full configuration of the frame.
Starting now you can very easily from your account at pix-star.com, not only read the current configuration of your photo-frame which is thousands miles away from you, but also, in just a few clicks, change any parameter.
This includes currently:
- Change the language of the user interface of the product;
- Activate or deactivate energy saving mode and configure the time the display switches on and off;
- Configure the way incoming photos by email are accepted (manually, semi automatically or full automatic mode);
- Adjust the time per slide for the slide show;
- Configure the mode for the slide show: Normal mode or random mode.
- Adjust the brightness of the screen;
The web site also displays a few other information that are quite useful:
- Percentage of the internal memory being used;
- Software version of the product.
This menu is accessible from inside your Pix-Star.com account, once logged in see on the left side menu bar, at the bottom, the link “frame config.”.
This should simplify even more the use of your Pix-Star or the one of your parents and grandparents!
Wi-Fi & internet connection
After connecting to your Wi-Fi network if you get a message “ERROR, return a HTML page” on top of the main menu of the Pix-Star this is because you are connecting to an access point that requires a confirmation via a web browser to grant access to internet.
This mode is NOT supported by the Pix-Star because there is no web browser inside your Pix-Star.
This happens with some routers (for example CISCO routers) that provide 2 accesses, one is the “GUEST” access and one is the “MAIN” access. If you use the MAIN access there will NOT be any such problem, once the security key is entered and the Wi-Fi is connected then the frame gets automatically access to Inernet.
Only the GUEST access requires an additional step which is to open a web browser and enter some confirmation. This is not possible with the Pix-Star.
So check this, MAKE SURE you connect to the main access, do NOT use the GUEST access.
This may also happen if you try to connect to some public networks such as Hotels, Hospitals, Retiring Home, Airports, etc… Because these networks work differently, the connection to the Wi-Fi has no security but the access to internet is controlled once you open the web browser and enter some user name and password. This mode is also NOT supported by the Pix-Star.
This is an important question.
Yes, even without any wireless connection, your Pix-Star can work normally and all features are active. No problem.
It will become a basic photo frame then, playing photos that you put in USB stick, SD card or copy to the local memory. Of course till you install a wireless router it WON’T be possible to receive photos by email or access web albums as this requires an Internet connection.
In a word, all features of the frame will work except the one in relation with Internet (receiving photo-mails, sending photo-mails, or updating Web Albums, etc…). But for all other features of a standard photoframe, no problem, your Pix-Star can work normally!
For example, viewing pictures in Web Album that have ALREADY been downloaded will continue to work. Just UPDATING web albums with new pictures will not work while the frame is offline.
A wireless connection (Wi-Fi) is NOT mandatory to use this product, just that some features related to the Internet won’t be available.
Hello,
This OFFLINE message inside the web site in your pix-star.com account indicates that the frame can’t connect to our system, most probably this means the wifi is not properly configured and the Frame is not connected to your Wi-Fi network.
So go inside the frame and in the main menu (exit slide show first) go to
Change settings menu
Then go to “Wi-Fi” menu and enter your information to connect to your Wi-Fi network.
The web site should show online again after a few minutes.
⚠️ Note : specifically for 10-15”
By default on the iPhone when you switch on the PERSONNAL HOTSPOT from the settings menu the first time it will assign a name to this access something like:
John’s iphone.
(this is an example, it’s the name of the owner + ‘s iphone)
but this:
‘s
uses a very special character encoding that only the iPhone uses and currently Pix-Star does not accept it (yes we know there is no problem with a PC or a MAC computer…).
So the frame cannot connect successfully to it.
To solve this actually it’s very easy. Just rename this network in the same menu personnal hotspot and remove this:
‘s
As you probably already know connecting to public access Wi-Fi networks including college dorms, assisted living facilities, hospitals or coffee shops is not possible from the Pix-Star because the frame does not have a web browser, which is required to accept web authentications that utilize a user name and password. This becomes a problem if the Pix-Star is to be used where only such internet access is available.
There is a solution to this problem though.
This requires a little bit of configuration work and the purchase of a new hardware but it remains reasonably cheap so we want to share here this information with all our users as it might help.
First you need to buy a NETGEAR TREK extender (or any other similar solution such as the HooToo), u can find it easily at amazon.com:
The Netgear Trek is super easy to set up and is specifically made to get past these public access web authentications and create a more secure Wi-Fi of your own. The Netgear Trek can be set- up via Smartphone, Tablet or Computer (any device that has a web browser and Wi-Fi capabilities).
Set-up the Netgear Trek via instructions (Netgear Trek Installation Guide) that come with the device. Configure the Netgear Trek via the “Wi-Fi connection at a public hotspot setup” section to connect to the public access network you want to use. Hint: When connecting to the Trek for the first time wirelessly you will need the Trek’s pre-installed SSID and password which can be found on the back panel of the trek.
Then login to the trek via the web browser and you can create your OWN new Wi-Fi network for which you choose a network name and a security method (we suggest to use WPA2 with AES encryption as it is the most secure available).
Now use a Smartphone, Tablet or Computer to connect to this new network and open a web browser, then authenticate to the public network from that browser.
And “voila”! Now the Web Authentication is done and any device that connects to this new Wi- Fi network created by the Netgear Trek does not need any Web Authentication anymore!
You can now go to the Pix-Star and have it connected to that new network which does NOT require anymore “web authentication” as this part is handled now by the NETGEAR TREK.
REMARK: there is a possible limitation though, depending on the network and how they set up the Web Authentication, but usually they require that you re-authenticate every 24 hours. So once a day all you have to do is accept the authentication via the device originally used to accept it….like a cell phone or computer used to set up the netgear trek.
(A BIG THANK YOU to Brandon B. for this smart yet simple solution!)
Pix-Star is very easy to configure including the Wi-Fi as most of the configuration parameters are ALREADY set by the device AUTOMATICALLY. The only missing information you need to enter (Pix-Star can’t find it for you, it is SECRET !) is the encription key.
But in some cases Wi-Fi routers have some advanced settings enabled for security that make it a little “tricky” for some users. Here you will find some TIPS to help you if you can’t manage to connect to your Wi-Fi network with your Pix-star.
TIP #1: make sure your encription key is the correct one!
This is sometimes forgotten… so double check it if it does not connect the first time with Pix-Star. Also be very careful that CAPITAL letters and SMALL letters are NOT the same, so you must enter the encription key as it has been defined with capital letters entered as capital letters with the Pix-Star on screen keyboard.
TIP #2: Make sure the “MAC address” filtering mode is not activated on the router
Some routers have the MAC ADDRESS FILTERING mode activated this means that EVEN if you enter the proper encription key the router with STILL REFUSE the connnection because it can’t find the DEVICE MAC address (something like it’s serial number) inside it’s internal database. So to connect to the Wi-Fi router when such security is activated you must:
– Either manually enter the MAC address (serial number) of your Pix-Star inside the router using the configuration pannel (web page);
– Or press some button on the router so that it TEMPORARILY disactivate this mode so that you can connect your Pix-Star to it.
We invite you to either read carefully the user guide of your Wi-Fi router or call the telecom operator hotline if the device was supplied by them.
TIPS #3: Make sure there is enough Wi-Fi signal seen from the Pix-Star
When you are inside the Wi-Fi configuration pannel of your Pix-Star the level of signal for your network is indicated, make surre you have at least 1 bar (ORANGE or GREEN color)
This
All Pix-Star units shipped after November 2014 support the connection of a USB keyboard.
Just plug it at the back of the unit on the USB port, restart your digital frame (or start it if it is turned off), and you can use it.This could be helpful for those of you who use a long password on their Wi-Fi networks!
Enjoy your Wi-Fi on Pix-Star!
Hello,
Regularly our Pix-Star Customer Support Team receives questions or emails similar to this:
We have an elderly mother without wifi.
Can we set up and manage a frame for her via our phone’s data OR bring her frame to our house, where we have wifi, to manage and add photos?
The answer is a big YES!!
Because the pix-star does not stream the pictures over internet, instead it stores them inside it’s internal memory once synced so it’s possible to play them even once there is no wifi anymore.
This way both use case described above work:
– you may put the frame at grandmother’s place and turn on your wifi hotspot on your phone when you visit her so that the emails that have been received in the meanwhile sync, and then when you leave the place they continue playing as they restored inside the frame.
– or your can from time to time bring Grandpa’s frame to your place where you have wifi, connected to the wifi and sync pictures during a few minutes, then bring it back to his home without wifi. Picture will play since they are now in the frame’s internal memory.
the pix-star Team
When you see the keyboard on the screen and when you want to enter the SPACE, move the selector to the RIGHT on the button:
a | A | #%$
Here you click 1 time on ok/play to select:
A
(capital letters keyboard)
then on the last line at the bottom of this keyboard the 3rd from the RIGHT is:
SPA.
It is space. Just click on it to have it inserted in your Wi-Fi password.
Sending photos by email & mobile app
When you send pictures to your frame to its email address make sure you put them as ATTACHMENT of the email, NOT in the body of the email.
Some email software or providers (such as for example GMAIL) allow to paste or drag and drop the picture inside the email, this is not good.
The picture is now inside a html page inside the email and NOT as an attachment.
Your pix-star won’t be able to find it.
Just write a normal email and then “add attachment” and choose the picture(s) you want to send to your frame, click ” SEND ” and that’s it!
It’s very simple just like any other app.
From your smartphone or tablet just click on the Android market (Google Play) or iPhone/iPad app store.
Once inside click on the SEARCH button then type:
Pix Star Snap
then launch the search.
just click to download, it’s FREE!
Enjoy your Pix-Star.
With Pix-Star as you may know you can NOT only receive photo-mails directly inside the frame but also send pictures from the frame to any email address, easily.
To avoid entering the recipient email address letter by letter which is a bit time consuming and boring, the Pix-Star automatically add email addresses of people that previously sent emails to your frame into your contact list that you can access from the frame’s “picture sharing” menu of the slide show.
But sometimes you want to send a picture to someone that is not inside this contact list.
You can add it in the contact list from the web site account at pix-star.com.
Just log into your account and on the left menu go down to the web page link:
Manage contacts.
Inside you can add new contacts, delete contacts, even create groups of contacts so that from the frame you can send pictures to the group of email instantly.
The modifications you do in the web site contact list will show up inside the frame after a few minutes, please be patient.
You need to check a few things.
1- FIRST, log in your Pix-Star web account at www.pix-star.com and see in the photo-mail inbox if the pictures have arrived.
Do you see them there?
If not then MOST PROBABLY you are using the wrong email address for your frame, all Pix-Star frames email address look like this:
xxxxx@mypixstar.com
where the ” xxxxx ” was chosen when you registered the unit.
The usual mistake is to use the extension:
xxxx@pix-star.com
this is WRONG it does NOT work.
If it’s not that you are not using the wrong email address then check if you receive in your mail box a message that bounce back from the network, there might be some error indication inside.
You might also contact us.
2- SECOND, if you see the picture inside the photo-mail inbox in your account at www.pix-star.com then it means that the email was properly decoded by our system, perfect!!
Now you need to check first that your frame is showing ONLINE on the upper right part of the web page, just below LOG OUT.
Is it ONLINE?
if yes then just wait a few minutes more, it should arrive soon in the frame.
If the frame is OFFLINE, it means it can’t access our servers, usually it’s a problem with the Wi-Fi connection of the frame.
You might check this, you can also try to restart the frame by unplugging the power cord during 15 seconds.
If you still can’t find the reason then contact us by email, do not forget to provide your Pix-Star email address. We will then help you with this.
Hello,
Regularly at the customer support we have users contacting us saying they can’t email from google photos to their frame.
This is because when you email a picture from google photos’s web site to an email address they don’t send the picture at attachment, they send a web page instead with a link to the picture embedded, this won’t work with the pix-star email management system.
You can try it sending a picture from google photos to yourself and you will see that the email you receive is not a typical email with picture in the attachment, it’s a beautiful web page in the email with a link to the picture and the picture embedded inside.
So, to send your Google Photos pictures to your Pix-Star, first save them on your phone or computer, then send them with the Pix-Star Snap app or as attachments of an email to your frame’s address.
Your pictures will show up on the frame’s screen after a few minutes!
The Pix-Star Team.
Hello,
As you probably know we offer a free Android and iOS app to easily upload pictures from a smartphone to a pix-star frame.
If you have not yet tried it do not hesitate to download dit from the App Store, search for ” pix-star snap “.
If you started using it already this tutorial will help you how to do multi selection of pictures to upload more than just 1 picture at a time. It will also show you how to navigate the history of the files you already sent.
-
Open the Pix-Star Snap Android App. Click on the “Share Photos” button and accept all permissions.
-
Swipe Up the photo slide underneath the camera view.
-
It displays the photo selection Grid View.
-
Click on the Check Icon on the Top Right of the view. Select multiple pictures by single press on any of these in the grid. You can scroll down and select older pictures if you want. Maximum is 30 items at once. You can unselect a picture by pressing it again.
-
History: the Green Check marks the pictures that have already been sent previously in the app. When you select a picture it will have a White marker. Then press the “OK” button to send.
Alternatively you can also activate the multi selection by Long Pressing on any of the picture in any of the 2 views mentioned before: Camera view & Grid view.
Enjoy your pix-star!
If you find ou that your iPhone / iPad Pix-Star Snap app does not show all the pictures that you else see in the Photos app of the iPhone then check this below.
To have all the pictures showing inside the Pix-Star Snap app you need to make sure you have the following configuration activated:
Go to
SETTINGS
of the iPhone / iPad then to:
Photos and Camera
then inside in the first section related to ” iCloud Photo Library ” make sure you have this selected:
Download and Keep Originals
DO NOT select:
Optimize iPhone Storage
same as on the picture below:
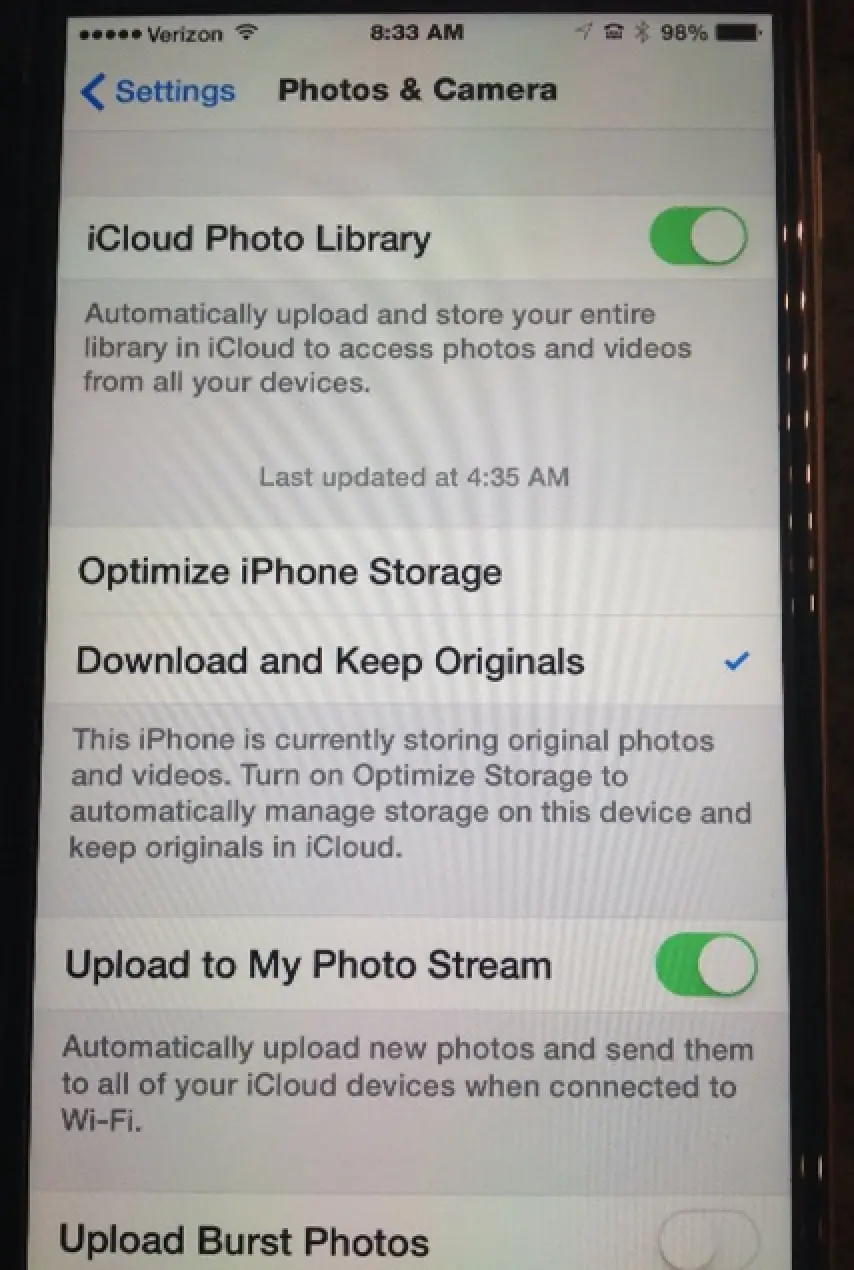
Now you should see all your pictures in the Pix-Star Snap app!
Many thanks to Ken S. for finding this and reporting the solution to us.
As you all know sending pictures to a Pix-Star frame is very easy using email. Put a picture in the attachment enter the email of your friends’ or family members’ frame and click send, that’s it!
But did you know that using the Pix-Star Snap iPhone/iPad app is even easier and faster?
Here is why?
There are a few reasons why you should use the app instead of the email:
1/ When using the iPhone/iPad app the pictures get resized automatically inside the iPhone/iPad before sending to the frame, so you upload only the quantity of pixels and bytes needed which optimizes the use of your 3G/4G data plan.
2/ Because of 1/ above uploading to the Pix-Star system is much faster making this method the most efficient available!
3/ With the Pix-Star Snap app you can upload one shot up to 30 pictures. It’s much more that what you could send using email attachments as the size of the attachment would be too big to be sent out.
4/ Pix-Star Snap allows you to upload videos directly to the frame with a resize here also before upload which makes it possible to upload videos up to 2 minutes length. This is not possible by email as the file gets too big and is not necessarily resized before sending.
5/ Pix-Star snap allows you to send one shot the same pictures to several frames at the same time. Also it’s user interface is very simple and once your friend’s and family members have been entered in the contact list just click on them, select the pictures confirm and upload starts. So easy!
It ‘s much faster than composing an email!
6/ One last point, using the Pix-Star Snap app you just don’t even need to configure email inside your iPhone or iPad, for some users it’s a must…
So far all these reasons above it’s important to download and use the Pix-Star Snap iPhone/iPad app.
This will make your life with Pix-star easier!
Enjoy your Pix-Star!
The latest software update (available for frames sold after 2013) includes a new feature called “Inbox Folder Mode”.
You can activate it by going to the frame’s Change Settings menu then Photo-Mail menu.
When activated, the frame will automatically save the incoming photo-mails in directories which name is the email address of the sender under the INBOX folder.
This way you get all your photo-mails classified in folders (albums) separately for each sender making this easier for you to search a specific picture if you know the sender. It’s also more convenient if you want to launch a slide show of only the pictures coming from a specific friend or family member.
Just go to the frame’s menu “My Photo-Mail Inbox” and inside you will see the folders (albums) that are being created.
Enjoy your Pix-Star!
When uploading files to your Pix-Star account (web albums) or when sending pictures by email to your frame’s email address you use any size for your pictures. The Pix-Star will adapt automatically to the size it receives.
But there are a few things you need to take into account to better “optimize” your pictures uploads and sendings.
The resolution of the 10 & 15 inch is 1024×768 pixels, this means that:
– sending pictures that are bigger than 1024×768 is not necessary as they will be resized to the native resolution of the frame upon receiving them by the frame. So for optimising your files upload speed and email sending you may (if you have the possibility) resize them to lower resolution providing it is higher than 1024 x 768 pixels for the 10 & 15 inch.
– on the other hand, if you send or upload pictures that are SMALLER than 1024 x 768 pixels for the 10 &15 inch, then the frame will display them but they will display small on the screen. This is normal. They don’t have enough pixels to fill in the whole screen. Your Pix-Star doesn’t “stretch” pictures to fit the screen as the result is usually “ugly” and “pixelated”.
To summarize:
Try to send files with a resolution close to 1024 x 768 pixels for the 10 & 15 inch, but always above 1024 x 768 pixels for the 10 & 15 inch.
Enjoy your Pix-Star!
If the language in your iphone/iPad is not English or French and you install the Pix-Star Snap iPhone/iPad app depending on the iphone “Preferred Language Order” settings it might happen that the app will be in French whereas you most probably would prefer to have it in English.
This is a configuration in the iPhone/iPad and it is easy to change by following the steps below.
1- Go to the menu
SETTINGS > GENERAL > LANGUAGE & REGION
2- Here you see something called:
Preferred Language Order
3- inside this list MAKE SURE that you have
ENGLISH
BEFORE
FRENCH
(and not the opposite).
if needed change this order by clicking on
EDIT
at the UPPER RIGHT of this window, then inside you can move up the “english” choice.
And voila, it’s done, the Pix-Star Snap app should now be in English.
Web albums & online services
The content of your Pix-Star is managed from your account at www.pix-star.com which you created when you registered the product.
Just log into your account, on the left side you should see:
“Import external pictures”
Click on this link and a page will show up with the providers we support: Dropbox, OneDrive and SmugMug.
Click on the one you want to import pictures from and follow the authentication process.
Once authenticated your albums should show up. Click on the “LINK IT” button on the right side of each album to bring them to your Pix-Star.
That’s it!
Pictures will show up on your Pix-Star frame within a few minutes.
A convenient way will also provide you with a backup copy of your work.
Select an album and choose download album button. All photos in that album will be saved to your computer in a archive “.zip” file.
After you download all of your albums, find the zip files and unpack them into similarly named folders. Log into your group account and create new albums. These new albums will show up on all group frames and not just the first one.
Load all of the photos you wish to share with the group. After sync, you will see that your first frame now shows two of every photo but the new frames show only the group-loaded albums. From your first frame account, either delete the original albums to remove copies. Or, if you did not share everything in the group login, create some new albums and copy individual photos that should stay for your first frame only and then delete the original album containing lots of duplicates.
Remember to load new photos to share with everyone only to the group login / account and load photos only for one individual frame on that individual login / account.
Also remember not to name albums the same on group and individual logins / accounts to avoid confusion.
If you store your pictures inside iPhoto/Photo application on a MAC and you want to upload them to you pix-star account a few steps are needed and they are not directly accessible from your computer.
1- Select the pictures you want to upload to the frame (do a quick test first with 2 or 3 pictures max.).
2- In iPhoto / Photo go to FILE menu then inside click on:
EXPORT
3- In the pop up menu make sure to choose “original” in the first line.
don’t resize the picture so that they don’t get too small on the frame screen.
4- Once done click ok and in the next window select the folder where to store them.
5- now you are ready to upload to you pix-star.com account. Log into it, then inside go to the left / middle
View my web albums
inside you create a pix-star web album then you can upload them there.
Another option here is to send them by email to the frame as u probably usually do. This is ok if you don’t have too many pictures otherwise it’s better to arrange them into web albums as said above.
Enjoy your Pix-Star!
Currently it’s not possible to directly print pictures from your Pix-Star account as we don’t have connection with other printing web sites.
What you can do is go to your www.Pix-Star.com account, select the pictures or the album you want to print, then you will see a “download selected” or a “download album” button so that you can download the pictures or album inside your Computer.
Once done, you can easily send them to your usual printing company or web site for printing.
When you are logged in your pix-star.com account, whether you are inside the inbox view or the web albums view, you can click on the drop down menu called “bulk action to all pictures” and inside you will find a choice “download all to the computer”.
This will generate a zip file with all your pictures inside that you can download to your computer as a back up.
For web album you need to select 1 web album first, then it’s the same.
The Pix-Star has an embedded Photo RSS reader that you can access from the menu:
My Local Pictures.
Then go to
My Photo RSS feed.
Inside you can just enter your feed URL and then it will automatically download the pictures inside, also it can auto refresh very often, down to just a few minutes.
It’s perfect for special applications where you want to have dynamic content displayed on the frame.
When creating your Photo RSS on your server it’s important to follow some rules to have it work.
Most important make sure that inside you have the MEDIA CONTENT tag and all info inside.
Something like this for each item (photo):
The required field is:
<media:content url=”http://www.yoururl.com/images/266/a02bd613-61b5-5439-aa50-d0668feaa09c/01_photo_04070929.jpg” type=”image/jpeg” width=”800″ height=”480″ duration=”90″ medium=”image”/>
or
<enclosure url=”http://www.nasa.gov/sites/default/files/styles/946xvariable_height/public/thumbnails/image/11127553_462870130536580_8621926794664070501_o.jpg?itok=r7812qgb” length=”136186″ type=”image/jpeg” />
in any case if you have problem finding the right syntax contact us by email at:
and give us your feed URL we will help checking it for you.
Enjoy your Pix-Star!
it’s possible by selecting all the pictures in that folder.
1- you create your pix-star web album in the web site first.
2- then you arrive inside and the interface is the one for uploading, you use not the multi picture upload.
when you click on the button a pop up window comes up, inside you can choose your files, so navigate inside the folder you wan to upload pictures.
3- click on the first picture, then MAINTAIN SHIFT key presses and go to the last picture.
on most computers it should select all the pictures from the 1st to the last.
4- then press ok / confirm it will start to upload them one by one.
REMARK: MAKE SURE that there is NOTHING else in the folder THAN PICTURES!!! for example no work document excel document or ZIP files.
When uploading pictures to a Pix-Star web album inside your account at pix-star.com you can use the multi files uploader.
This way you can select multiple files at once and upload them altogether.
There is a limit though here and the maximum number of files you can select is 200 files.
So make sure to select maximum 200 files.
But there is no problem to upload several times and this way add several thousand of pictures inside a web album.
Remember that the maximum number of pictures per web album is:
3,000 pictures.
so do not go over this number for a single web album otherwise the frame will sync only 3,000 pictures.
But you can create as many web albums as you want.
No.
When you copy pictures tot the frame’s local memory from an SD card or a USB stick, these pictures stay inside the frames memory and will not display online in the web site pix-star.com in the frame account.
They stay in the frame and will not sync back to the web site.
USB stick, SD card & storage
Hello,Sometimes
it may be interesting to copy pictures stored in the internal memory of the frame onto an SD card or USB stick, either as a back up or for other usage.
You can easily copy pictures from your Pix-Star’s local memory to a USB stick or an SD card.
Take the USB stick or the SD card and plug it to the device (look at the back of the device for USB and SD card port).
The frame will display a logo on the main menu and a message that invites you to automatically start a slide show from this source, you can discard this message.
Then go to the main menu of the frame and here go to ” My Media Library” (on old pix-star models this is called “File Manager”). Once inside go to ” photo mail” and you should see your inbox pictures.
You can select the one you want to copy one by one (move the cursor to the picture then press “OK / PLAY”) or, better, if you want to copy all of them just press the “MENU” button when you are on any of the pictures, it will display a menu inside which you have the “SELECT ALL” choice.
Press MENU again if not done yet, to display the pop up menu and choose ” Copy selected pictures to… ” this will pop up a window in which you can choose the destination directory, either SD card or USB card.
After this choice the frame will start to copy. It may take some time depending on the number of pictures and their size. Pix-Star will automatically re-size them to fit the screen size and optimize the memory usage without of course impacting the quality of the picture.
You’ve probably tried it before… When you insert a USB memory stick or a SD card into your Pix-Star, it is AUTOMATICALLY detected and the device provides the option to launch a slide show, which will show all the pictures stored on the SD card or USB stick.
This is quite convenient and fast for those who want it simple and would like to see all the content of the USB or SD card in one big slide show.
What should you do if you only want to display some or all of the pictures in one specific directory?
1- MY LOCAL ALBUMS: This first and simplest approach should be sufficient in most cases: go to the “My Local Albums” menu where you can access the USB disk or the SD card (shown in GREEN).
Once in this sub menu, you’ll see a tree showing all pictures and directories on your device (directories are displayed in GREEN). When you move the cursor to a directory, it will display (after approximately 2 seconds) a mini-slide show allowing you to PREVIEW the pictures within the directory. Should you want to see a more extensive view, simply click on it and you will access the directory.
If you move the cursor onto a picture file, you will see a preview of that picture.
You can directly launch a slide show of the CURRENT directory using the menu on the first line called “Play albums” (in BLUE): this will play a slide show of the current directory, all its pictures PLUS all sub-directories contained within.
This menu is “recursive” meaning it will include all sub-directories within the main directory then stop when it arrives at the last one. The same process applies for SD cards and USB memory sticks.
This is the recommended browsing method as it is the easiest and, with the preview option on the right, it is also more “visual”.
2- FILE MANAGER: For those who prefer more control in their picture selection and preview process, we recommend the FILE MANAGER.
Basically once you open the file manager and choose the SD card or USB device, it is similar to using the Local Albums method, in that you can view and access your directories and see the pictures in each directory.
The primary difference between the two methods is the screen layout.
The File Manager offers one significant advantage over the “local albums” method: you can LAUNCH A SLIDE SHOW WITH THE PICTURES YOU SELECT. It is a totally customizable slide show!
How do you do that? Click on each picture you want to include in the slide show. Once you’re done, click on the MENU button. In the pop-up menu, choose “launch slide show”. A slide show of your selected pictures will then start.
These two menus offer very useful and simple ways for you to browse through pictures on your SD card or USB stick. Try them for your next slide show!
You can easily copy pictures to your Pix-Star’s local memory using a USB stick or a SD card.
Take the USB stick or the SD card that contains the pictures you want to copy to the frame and plug it to the device (look at the back of the device for USB and SD card port).
The frame will display a logo on the main menu and a message that invites you to automatically start a slide show from this source, you can discard this message. Then go to the File Manager accessible from the main menu and browse your USB or SD card source. You should now see your pictures.
You can select the one you want to copy one by one (move the cursor to the picture then press “OK / PLAY”) or, better, if you want to copy all of them just press the “MENU” button when you are on any of the pictures, it will display a menu inside which you have the “SELECT ALL” choice.
Press MENU again if not done yet, to display the pop up menu and choose ” Copy selected pictures to… ” this will pop up a window in which you can choose the destination directory. You can even create a new local directory inside the frame.
After this choice the frame will start to copy. It may take some time depending on the number of pictures and their size. Pix-Star will automatically re-size them to fit the screen size and optimize the memory usage without of course impacting the quality of the picture.
Out of the box your Pix-Star comes with some pictures in it’s memory. These files may show in the slide show while you start receiving photo-mails during the first days of use.
If you want to delete them just follow one of the 2 options below.
From the SLIDE SHOW:
When the picture you want to delete is playing in the slide show press the MENU button, on the menu bar on the left move down to the “dustbin” logo then press OK/PLAY button. A pop up message ask you to confirm or cancel. If you CONFIRM the picture will be permanently deleted.
You can just do this for each of the pictures you want to delete.
From the My Media library / FILE MANAGER menu:
In the frame main menu go to
my media library / File manager
menu.
Once inside go to the folder called PIXSTAR then to INBOX if in the file manager (old frames) or in the “my media library” menu go to Photo mail menu in the first line.
Here you select the pictures you want to delete by moving the SELECTOR on it then press OK/PLAY. Once you’ve finished the selection press MENU button. In the menu list that pops up choose “DELETE SELECTED” then your pictures will be permanently deleted.
YES!
You can just go to the frame’s main menu then to
CHANGE SETTINGS
menu at the bottom and inside go to
ABOUT
menu.
The % of memory currently used is shown here.
Hello,
Theoretically there is no limit, any size of USB stick or SD card should work with your Pix-Star.
Make sure the USB stick is fully inserted.
Make sure also that your USB stick or SD card is formatted FAT32 or exFAT.
Enjoy your Pix-Star!
if you exit the slide show (press back key) you arrive in the main menu where you have all the menus for the frame.
Go down and you can see one line named:
FILE MANAGER
Enter this one, inside you can manage your local pictures, delete, copy, etc… Press the MENU for more options.
UPDATE NOVEMBER 2018!!!!!
For products sold after November 2018 the menu is now changed and the
FILE MANAGER
is now replaced by the:
MEDIA LIBRARY
menu.
Hardware & accessories
You can use the same method you use when cleaning the screen of your flat panel or computer screen.
Typically you can use a slightly damp microfiber cloth.
DO NOT put directly water on the screen!!!!
Your Pix-Star should then look like new!
If you’ve lost your power adapter for your pix-star or the stand or the remote control and you want to get a new one you may check our SHOP:
http://shop.pix-star.com/collections/all
The Pix-Star Team.
At the back of your Pix-Star you have 2 types of wall mount options:
1- A standard VESA mount.
REMARK: the VESA mount system is NOT supplied with the product and has to be purchased separately.
2- Also hook-type mounting holes.
You can choose the one is more suitable for your use.
if you lost your frame remote control or power adapter or metal stand you can get a new one from our shop hat this link:
https://shop.pix-star.com/collections/all
REMARK:
Be careful for the 10.4 inch pix-star, the power adapter before November 2015 and after is different!!
A few things you may try to quickly solve this issue:
1- First try to restart the frame by unplugging the power adapter from the wall outlet during 15 seconds then plug it back.
Wait for the frame to restart and try again.
Is the remote working now?
2- If not try to change the batteries inside the remote and try again.
Be careful when you put the batteries inside as the direction of each battery is important.
Does it work now?
If it is still not working and your frame I less than 2 years old, contact us through the customer support link at the upper right corner on the main page of the www.pix-star.com web site.
if your frame is older than 2 years then the remote is out of the warranty period so you need to buy a new one from our shop using this link:
https://shop.pix-star.com/collections/all
Enjoy your pix-star.
Your Pix-Star frame uses one of two power adapters:
- 5V adapter: output 5 V, 2 A (10 W), used by the LUX 10" frame
- 12V adapter: output 12 V, 2 A (24 W), used by the LUX 15" and LUX 17" frames
Some older Pix-Star models used a different adapter (for example a 12V adapter for a 10-inch frame): check the label on yours.
Both adapters accept any mains voltage from 100 to 240 V and use the same jack plug: 5.5 mm outer diameter, 2.1 mm inner diameter, center positive (+ inside, − outside). If you use an extension cable or a replacement adapter, make sure it has this plug and the same output voltage, with at least the same current.
Actually this is just a marking on the protective plastic we put on the screen in the factory.
Once you start using the Pix-Star you need to remove this plastic by pulling the red part from one of the corners of the screen.
This will pull off the protective plastic and remove the “E7” written on it.
The Power cord’s length is:
1.8 meters
5.9 feet
Approximately
You should buy this type:
M4-.70×6.
Slideshow & display settings
Hello,
By default the slide show shows the date and time at the upper part of the screen.
Of course this is optional you can disable this if you prefer.
When slide show is playing press the MENU button on the remote control or at the back of the unit.
In the menu bar that shows up on the left side go to the 2nd icon from bottom named:
Slideshow Options.
inside go to
clock settings
and then change to
no date & time
(on the last line of the list)
Done!
The Pix-Star Team.
When the picture is showing on the screen press the MENU button.
A menu bar will show up from the left.
Move down inside to the ROTATE button in the midle of the list, press ok/play and the picture will rotate 90 degres. Press again to rotate 90 more degres.
The picture is now rotated and saved.
Hello,
Use the remote and press the up and down arrow buttons to control the volume while a video or audio is playing in the slideshow to adjust sound level.
The Pix-Star Team.
If your Pix-Star is the latest generation (sold after November 2014) then you have in the slide show OPTIONS menu in the ” PLAY MODE ” section two new slide show play modes in addition to the normal mode (default).
REPEAT RECENT PIX.
This will repeat the pictures that arrived during the period you choose (for instance ” last 3 days”) more often than the ones that arrived before that, in the side show rotation. We have a special algorithm for that.
The main objective of this play mode is that your recent pictures play more often in the rotation so that you see them more frequently.
ONLY LATEST PICTURES
This play mode will only show in the slide show rotation the pictures received recently during the period you choose (for example only pictures received in the last 3 days).
Any picture received BEFORE that period will NOT show in the slide show!!!
Have a nice Pix-Star!
When the slide show is playing, press MENU button.
Move down to the 2nd button from the BOTTOM in the menu bar, it’s the “OPTIONS” menu.
Press ok/play to enter.
Inside you can adjust all the parameters of the slide show, one is the slide show mode where you can choose “RANDOM”, by default the frame is in “NORMAL” mode.
To configure the weather on your Pix-Star you have to log in your account at www.pix-star.com.
Once logged in, on the left side, in the menu list you can see:
My Weather channels.
Click on this link in the new page you can add a country and add selected cities for this country for which you want to receive weather information.
After a new country or city is added you need to wait for our system to update the weather so that it can display on your frame, this may take a few hours.
If the city you want to add is not listed click on the “Suggest a weather city” link to inform us, we will add it for you (if the city is available for our weather data provider).
To REMOVE the weather it is in the same webpage, go to “My Weather Channels” then on the right side of the name of the country and city click on the little icon with the “dustbin” to remove it.
It will disappear from the frame after a few minutes (make sure your frame’s Wi-Fi connection is configured).
First exit the slide show by pressing MENU button 2 or 3 times.
Now you arrive in the main menu, go to the CHANGE SETTINGS menu and inside go to the DATE&TIME menu here you can adjust manually the date and time.
REMARK: If you don’t see the CHANGE SETTINGS menu at the bottom of the main menu it’s probably because you have a software update available. In this case the CHANGE SETTINGS button is changed into “New software available!”. Click on this button first to update your frame, once done, the CHANGE SETTINGS menu will be visible again.
You frame is now adjusted to the right time!
Once your frame is registered in our web site www.pix-star.com and providing you have the Wi-Fi connection properly configured, then our Web Radios database will get downloaded inside the frame.
To play a web radio in your Pix-Star just go to the
My Web Radios
Menu, accessible from the main menu of the frame. Inside the web radios are accessible by COUNTRY or by GENRE.
Enter the menu you want and browse to find the web radio you’d like to play then press OK/PLAY to start playing. The web radio will play after a few seconds of data buffering.
The Pix-Star Team.
By default your Pix-Star displays the current date and time on top of the slideshow (overlay).
If you want to remove this just press MENU when a slide show is playing, on the menu bar on the left side that pops up move to the second logo starting from the bottom, called “options”, inside you can then deactivate the display of the date and time.
Only Pix-Star frames sold after November 1st 2014 support the possibility to switch between Celsius and Fahrenheit .
Before that the temperature unit is based on the country of the weather and cannot be changed.
So if you purchased the frame after nov. 1st 2014, first make sure you downloaded the latest software version.
Then go to “Change Settings” menu and then to “date & time” inside you have a choice between Celsius and Fahrenheit for the weather.
Just click on it and select what you prefer.
Have a nice Pix-Star.
YES!
Pix-Star does have a mode in which 5 pictures are shown at the same time on the screen in a collage.
You can activate this from the slide show by pressing MENU button then in the menu bar on the left go to the 2nd button from the bottom called ” OPTIONS ” inside you can choose the slide show mode which has COLLAGE inside .
This is also the mode by default for the slide show when you switch on the device the first time.
Hello,
After you have successfully uploaded pictures to a web album inside your pix-star.com account it is not possible to rearrange (sort) them in the order you want.
Actually there is no possibility to change the order of the pictures from the web interface currently.
The Pix-Star Team.
Here some information on the major parameters and options for the Pix-tar slide show.
Available intervals (between each pictures)
2 seconds,
3 seconds,
5 seconds,
10 seconds,
15 seconds,
30 seconds,
1 minute,
5 minutes,
10 minutes,
30 minutes,
1 hour,
6 hours,
12 hours
Play Modes
– Normal mode
– Repeat recent pictures (this mode populates the photo list in order to play the latest pictures more frequently) of the last day, 2 days, 3 days, week or month.
– Only latest pictures (this mode will display only the latest available pictures) of the last day, 2 days, 3 days, week or month.
List of available transitions
Horizontal Sliding,
Vertical Sliding,
Rotations,
Zoom in,
Flip,
Fading,
Ken Burns Effect,
Boomerang,
Wheel Clockwise,
Wedge,
Multi 1,
Multi 2
Display Modes
– Normal mode (show one picture at a time, keeping the picture’s size ratio)
– Collage 4 pictures (display a collage formed by 4 pictures)
– Collage 5 pictures (display a collage formed by 5 pictures)
– Smart Fill (auto fill the screen, stretching the picture if necessary, only when the picture ratio is close to 4:3 to avoid too much distortion.
– Upscale to fit (If a picture is smaller than the screen but at least 70% of the screen, the slideshow will auto upscale it to fit while preserving the aspect ratio)Sorting Modes
– Alphabetical mode
– Newest first
– Oldest first
– Random
Hello,
When playing a slide show on the frame you may see some pictures repeated more often than others or you may be seeing only some of your pictures others are not showing.
Here is a check up list to understand the problem and solve it.
1- first of all to make sure you are playing a slide show that includes all the frame’s pictures.
Exit the slide show and go back to the main menu.
here click on the item:
play all the frame’s pictures.
this will immediately launch a slide show that includes all possible sources of pictures altogether including: pictures coming by email or from the app (photo mail), pictures from your web albums, pictures from an SD card (if any), pictures from usb stick (if any).
2- there is in the change settings menu of the frame and in the menu
slide show
then going to the option
play mode
the possibility to “repeat latest pictures more often”.
make sure that this is NOT selected. Go back to normal mode if needed.
If you select this then some pictures (the most recent ones) will be repeated more often than oldest ones so it is then normal you see some pictures repeatedly.
3- make sure you do NOT have some duplicate.
It is possible that you have the same pictures file several time stored in the frame.
So check this in the ” my media library ” menu, accessible from the main menu inside the frame (exit slide show first).
if you have duplicates you need to delete them.
Enjoy your pix-star!
YES, this is possible.
When you exit a slide show to do something for example inside the CHANGE SETTINGS menu or any other menu, after you finish, if you want that the frame starts with the SAME previous slide show then proceed like this:
Just exit the submenu you are in by pressing the back key (it’s the key with a round shape arrow on it) then you arrive again in the main menu (the one that starts with “Play all the frame’s pictures”.
Once here, just wait, do nothing.
After about 20 seconds the frame AUTOMATICALLY starts again with the previous slide show you were playing AND ALSO it starts automatically EXACTLY at the same picture it was playing when you stopped the slide show.
Sometimes pictures received by email display small in the middle of the screen. How come?
Actually this is not a problem with the pix-star. It’s because they were sent already too small by the sender email software as some software, especially on smartphones but also on MAC computers, have this feature: they propose to re-size the file before sending to make the whole email file smaller.
The Pix-Star never re-sizes pictures as thumbnail or smaller than the size of it’s screen. It always keep it the same size as when the picture arrives.
So if some pictures show too small it is because they were sent small to the frame.
You may then double check this:
1- May be the file is already very small inside the sender’s smartphone or computer? In this case there’s no solution, the file is small, the picture resolution is also small, that’s it. For your information to have the picture fill the whole screen of the Pix-Star it must be bigger than 1024×768 pixels.2- If the file was sent by email to the frame then most probably the problem comes from the software used to send this picture. Nowadays most of the smartphones especially iPhones resize pictures BEFORE sending them out, and if the chosen size is too small then they arrive as thumbnail. This is also the case if you use a MAC computer to send pictures by email.
But this can be adjusted on the MAC or the iPhone or the Smartphone before sending. So check again next time you send a picture or tell your friends to be careful about the size they choose when they click on the “send” button.
If some of your pictures don’t load properly in the slide show and show us just as a black screen check the file name of this picture.
Make sure there is not that special character inside:
# (hash)
if any inside rename the picture file and remove that character.
The picture should then show up properly.
The Pix-Star Team.
The idea of a ‘collage’ as you may do at home with a printed pictures is to put them one next to the other to make a whole surface covered by pictures to show them together.
To do this it’s important that there is no “black spaces” between pictures otherwise the collage does not look like it’s fitting together closely and it doesn’t look that nice.
So to achieve this on the frame the only solution is to crop pictures that don’t have the same ratio as the window in which they go for the collage. Sometimes by cropping we loose some part of the picture especially for portrait pictures and this may give results where the upper and lower part of the picture is not showing up (the “head is cut off”).
This really depends on which window of the 5 picture collage the picture is located. Some windows the picture will fit better than others, but there is no way to avoid this if we want to really make a collage where there is no black spaces between pictures.
As an alternative to this, you can try our new collage 5 pix slide show that we’ve just launched which is called:
collage 5 pix (no crop)
this one does not crop pictures but then it’s not a ‘true’ collage as there will be black spaces sometimes between picture, so the result is not as good as the other one probably. But if this is ok for you then you can just go for the this one.
At the end of the day, if you don’t want any cropping then switch back to the normal mode where you have 1 picture at a time on the screen this will always preserver the picture ratio and won’t do any cropping.
Enjoy your Pix-Star!
As you’ve probably already noticed while using your Pix-Star, it offers many different type of slideshows. You can practically launch any kind of slideshow from just 1 picture, to 1 album or even a combination of albums.
Also as the Pix-Star has a local memory, and at the same time can access photos from the web and from USB sticks or SD cards, it can play albums from various sources.
So when you are launching a slideshow you should first check which source of photos it is going to play. For example, if you launch a “play all pictures” slideshow from the local memory then the web album pictures won’t be inside this slideshow, same for weather information. But the pictures coming from email will be in the slide show as they are inside the “My Local Albums” menu.
As you’ve seen also, in the frame main menu, you have a button called “Play all the Frame’s Pictures”. This button is the default button for playing a slide show of ALL the photos of your Pix-Star, no matter from which album or which source they come.
We strongly suggest, especially for non technical-savvy users to use this slideshow. It is by the way the default slide show that will run AUTOMATICALLY when you unpack the product the first time or after a factory reset.
It is the EASIEST slideshow, that you can be sure to have ALL your photos inside, including Web album pictures, Weather, Photo-mail, SD card, USB stick, etc…
No question matches your search. Try another word. Contact support