
Time needed: 5 minutes.
Here’s how to view Facebook photos on a digital photo frame! We’re specifically focusing on the Pix-Star digital photo frame as it has one of the most versatile web album features on the market. These steps will also work for viewing photos on your Pix-Star frame from Instagram, Google Photos, Google Drive, Dropbox, Flickr, and more. Let’s get started!
- Log into your web interface dashboard


Pix-Star’s web album feature is primarily controlled via the web interface. It offers an intuitive and familiar way to control which folders are synced to which frames. You can add all the frames in the family to a multi-frame control group that lets you manage up to 25 connected Pix-Star frames.
Go to pix-star.com in your web browser. Make sure your Pix-Star frame is on and connected to a stable Wi-Fi network. Click “Login” to enter your user account. If you’ve registered your frame before, simply click on the frame’s name & button at the top of the window.
If this is your first time using your frame, click on “Register a New Frame” at the top of the screen. Follow the on-screen instructions to successfully register your frame. You’ll find the serial number for your frame in the “About” section of the “Settings” page on your frame. Once you’ve registered the frame, click on its name at the top of the screen to enter the dashboard.
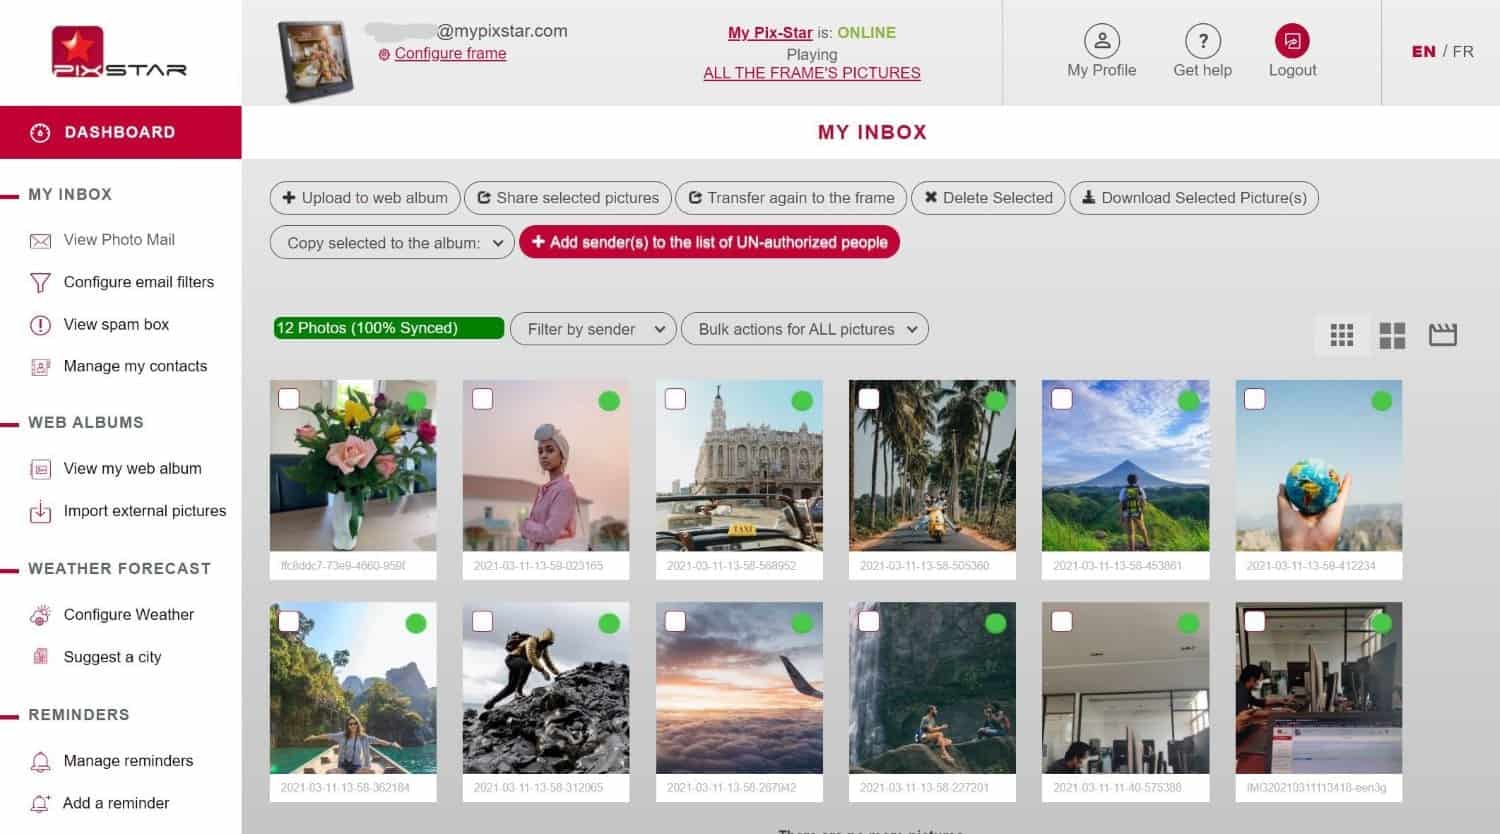
The dashboard is where you can manage the frame’s storage, settings, slideshows, and more. You can also create and log into the multi-frame control account if you want to manage multiple frames at the same time. In the dashboard for any frame, you can see if the frame belongs to a multi-frame control group at the bottom of the left-side panel. It will say “This frame is part of the multi-frame control group: xxxxx.xxxxx@mypixstar.com”. This is the login email you need to use when logging into your user account if you want to manage frames from the multi-frame control user account. - View your connected web albums
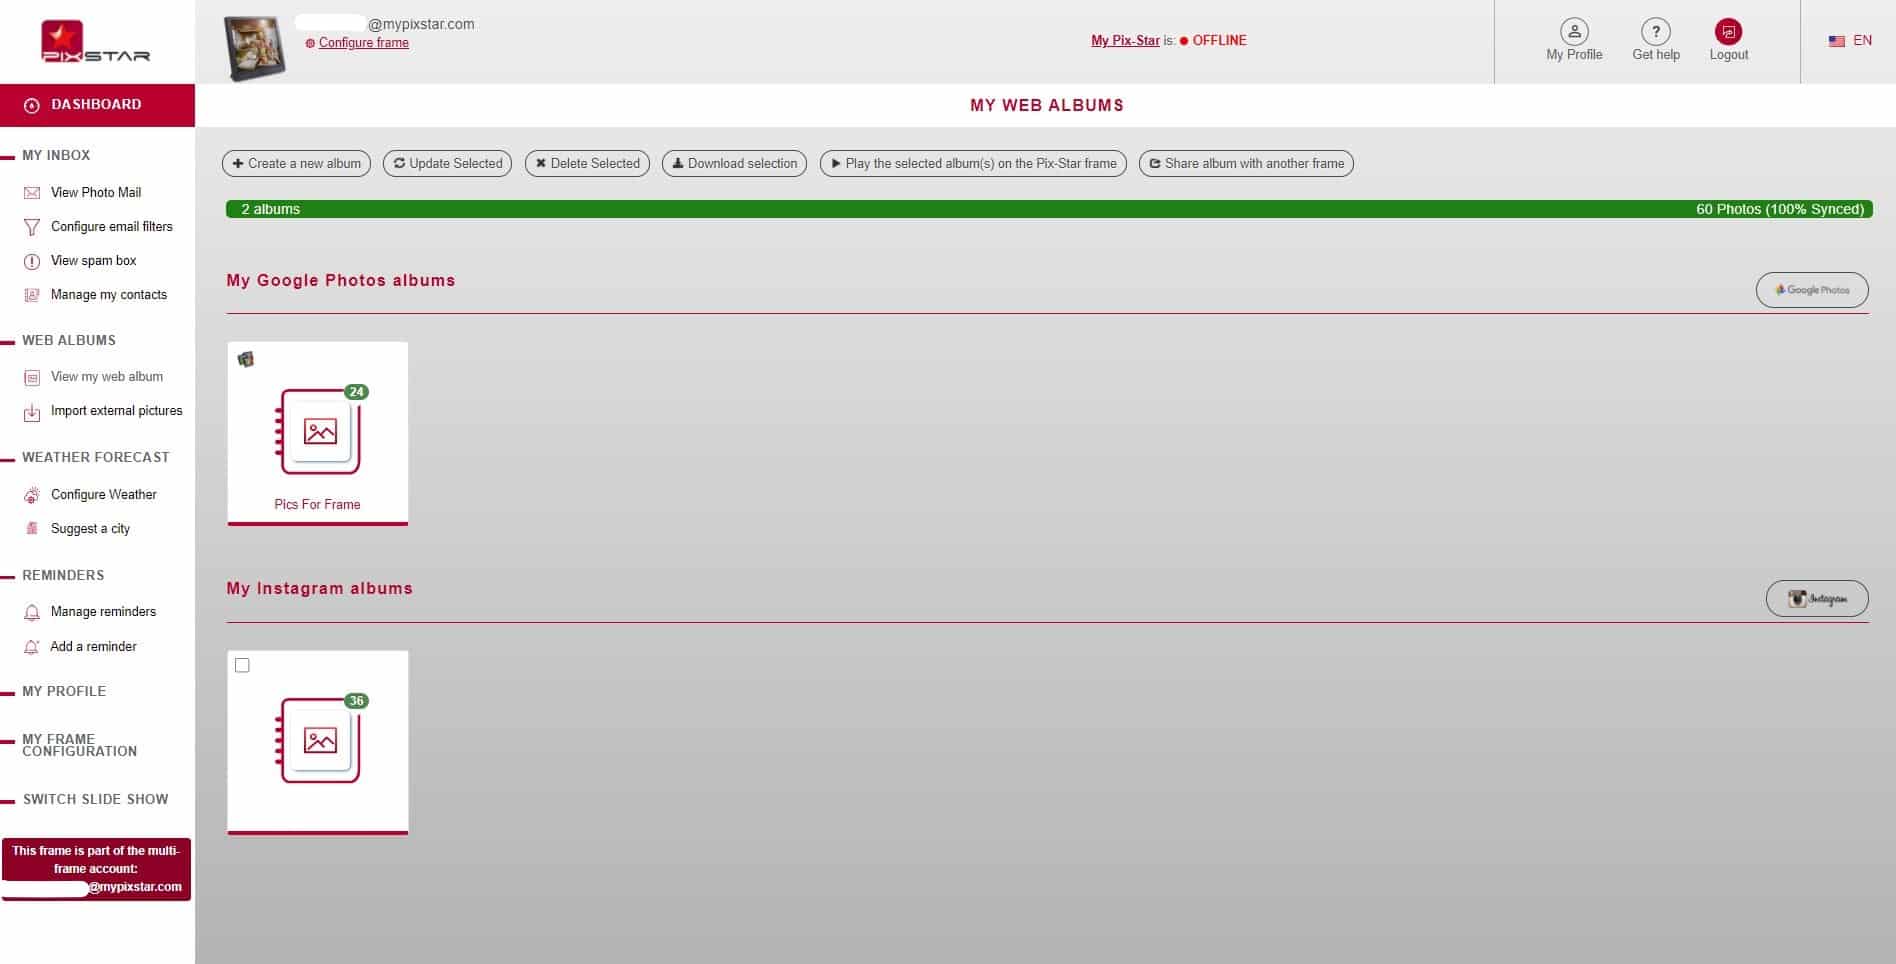
Once you’re in your Pix-Star frame’s dashboard (or the multi-frame control account), look at the left-side panel. Navigate to the “Web Albums” section. There should be two clickable options under the “Web Albums” heading. Click on the “View my Web Album” option.
This takes you to the web album browser page where you can see which web albums from social media and photo-sharing sites have been previously linked to your frame. Each web album source will have a dedicated heading and section. Here you can see all the different albums from the linked platform that have been synced to your Pix-Star frame in the past.
Clicking on any of the listed albums in this list will open the album to show you all the linked & synced photos inside. Here you can manually select photos from the album and perform bulk actions. These include deleting, updating (force sync), and starting slideshows on the frame from the selection. It’s a great way to start slideshows remotely and to make sure you aren’t trying to sync photos to your frame that have already been linked in the past.
Note that if you try to delete web albums, you’ll be prompted if you want to delete the photo both from the frame and from the cloud. If you choose to only delete the photo from the cloud, it won’t be removed from the frame’s internal storage. This means you can still view the photo in slideshows – though you need to manually delete it on your Pix-Star frame to completely remove it. Learn how to delete photos from a digital photo frame here. - Import pictures from Facebook to your frame
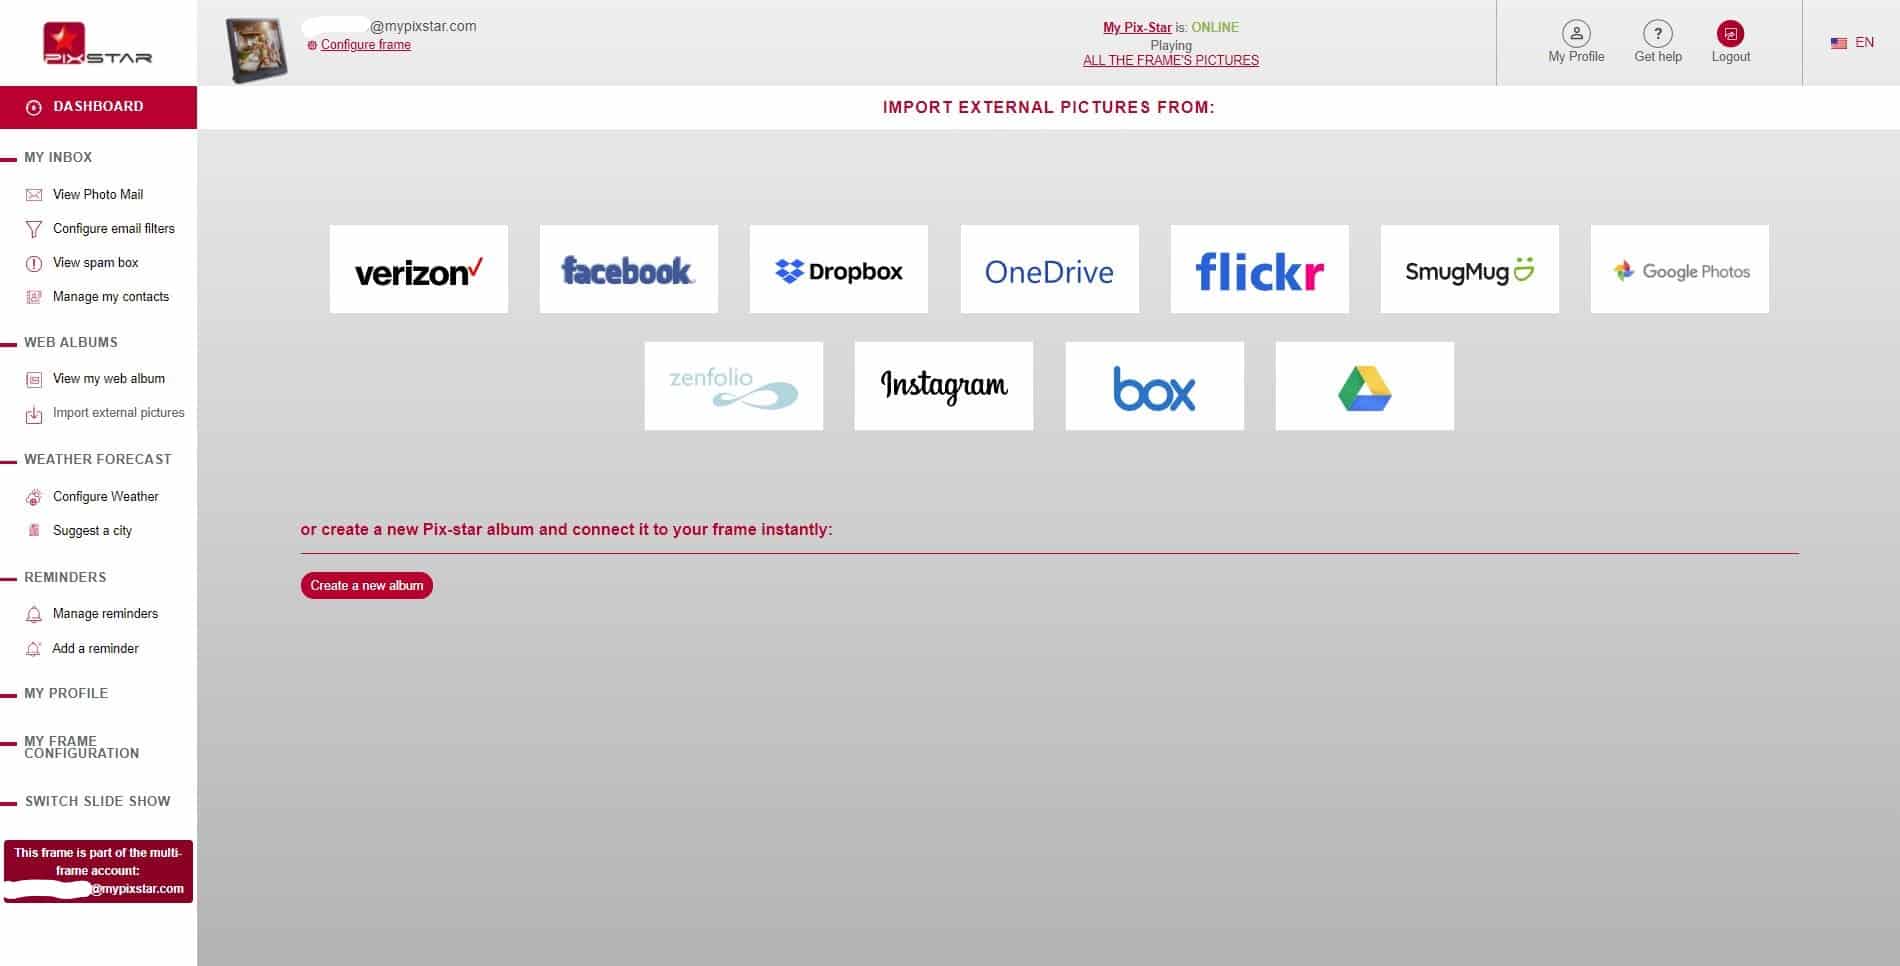
This is where you’ll learn how to view Facebook photos on a digital photo frame. Note that this importing and syncing method is the same for other platforms like Instagram, Google Photos, Flickr, etc.
In your Pix-Star frame’s dashboard, navigate to the “Web Albums” heading in the left-side panel. Click on “Import external pictures” and you’ll be taken to the platform selection page. There are 11 different supported platforms to choose from. Pix-Star has agreements with each of these platforms to allow you to import and view selected albums directly on your Pix-Star frame.
To import photos and albums from your Facebook page, click on the “Facebook” tile. You’ll be prompted for your login information for the Facebook account you’d like to connect. You aren’t limited to connecting and importing photos from just your Facebook account. You can import from other family & friends’ Facebook accounts too. Fill in your login information and allow access when asked.
Once you’re done, all of the albums on the linked Facebook account will be listed on the display. On the right side of the screen, each of the albums has the current linked status and an option to link/unlink the album. To link and sync an album to your Pix-Star frame, click on “Click to link”. This immediately starts the syncing process.
It can take a couple of minutes to sync the pictures to your frame depending on the size and number of photos in the linked album. Note that you can’t link individual pictures and can only sync albums. Go to your Facebook account and create a new album with the pictures you’d like to link for a more personalized and customized selection. - Start a slideshow with your new pictures
All of the linked web albums are saved to the Pix-Star frame’s internal storage. This means you can view any linked albums on the frame even when you’re not connected to Wi-Fi. It’s a great solution for families and elderly users that don’t always have Wi-Fi or don’t get to update their frames too often. It’s also an excellent automated way to ensure everyone in the family gets all the latest photos without much input required.
On your Pix-Star frame’s home screen, click on the “My Media Library” to enter the file explorer. All the sources of pictures and other media are listed horizontally at the top of the display. Navigate to the “Web Albums” tab to view all linked web albums.
Each linked album has a heading and section. Select the “Select web albums to play” from the left-side panel and press “OK”. Now you can select all the web albums to include in a slideshow. Once you’ve made the selection, select “Play selected web albums” and press “OK”. This creates a slideshow containing the pictures in the selected and synced web albums. Simply select the “My Facebook Album” and play a slideshow from that album to view only the pictures linked from Facebook.