
Time needed: 10 minutes.
In this guide, we explore and guide you through how to use a digital photo frame in only 7 steps. You’ll learn how to get started, register your frame, how and where to download the essential mobile app and start sending photos to your frame.
By the time we’re done here, you’ll have the basics down and be ready to start sharing precious moments and memories with your loved ones. Digital photo frames make sure everybody in the family can get involved and that nobody is left out.
You’ll get some helpful tips and tricks on what to look for in a digital photo frame – and which features and functions matter the most! With all this in mind, let’s get started!
- Connect to Wi-Fi
 Learning how to connect to Wi-Fi is the first and most important step in learning how to use a digital photo frame. It’s worth noting that some digital frames don’t offer Wi-Fi connectivity as a feature. In this case, we’re looking at the Pix-Star digital photo frame – a Wi-Fi and cloud-capable premium frame.
If this is your first time using the Pix-Star frame from the box, the setup wizard will guide you through the whole process – including connecting to Wi-Fi. Make sure you have your Wi-Fi username and password handy and the remote control for the Pix-Star frame (alternatively, you can use the frame’s onboard controls.
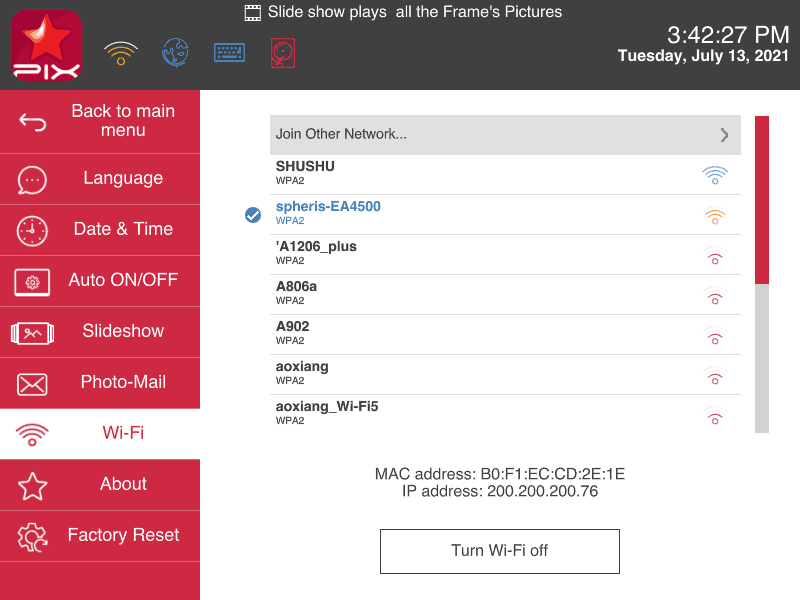
If your Pix-Star frame has already been set up you need to connect to Wi-Fi by going to the settings menu. Simply navigate to the “Settings” tab from the home screen and press “ok”. Here, use the arrow buttons to scroll down to the “WiFi” tab (3rd from the bottom) and press “ok”. Select your home Wi-Fi network from the list and press “ok”. Input your Wi-Fi password using the on-screen keyboard and select “Enter” when you’re ready. Click “Join” to connect. It might take a couple of seconds to process and save the connection.
P.S. You can’t connect to a Wi-Fi network that requires web authentication. This is often the case in offices and coffee shops, with some modems also requiring web authentication. Try to connect to your home network. - Register your frame via the web interface
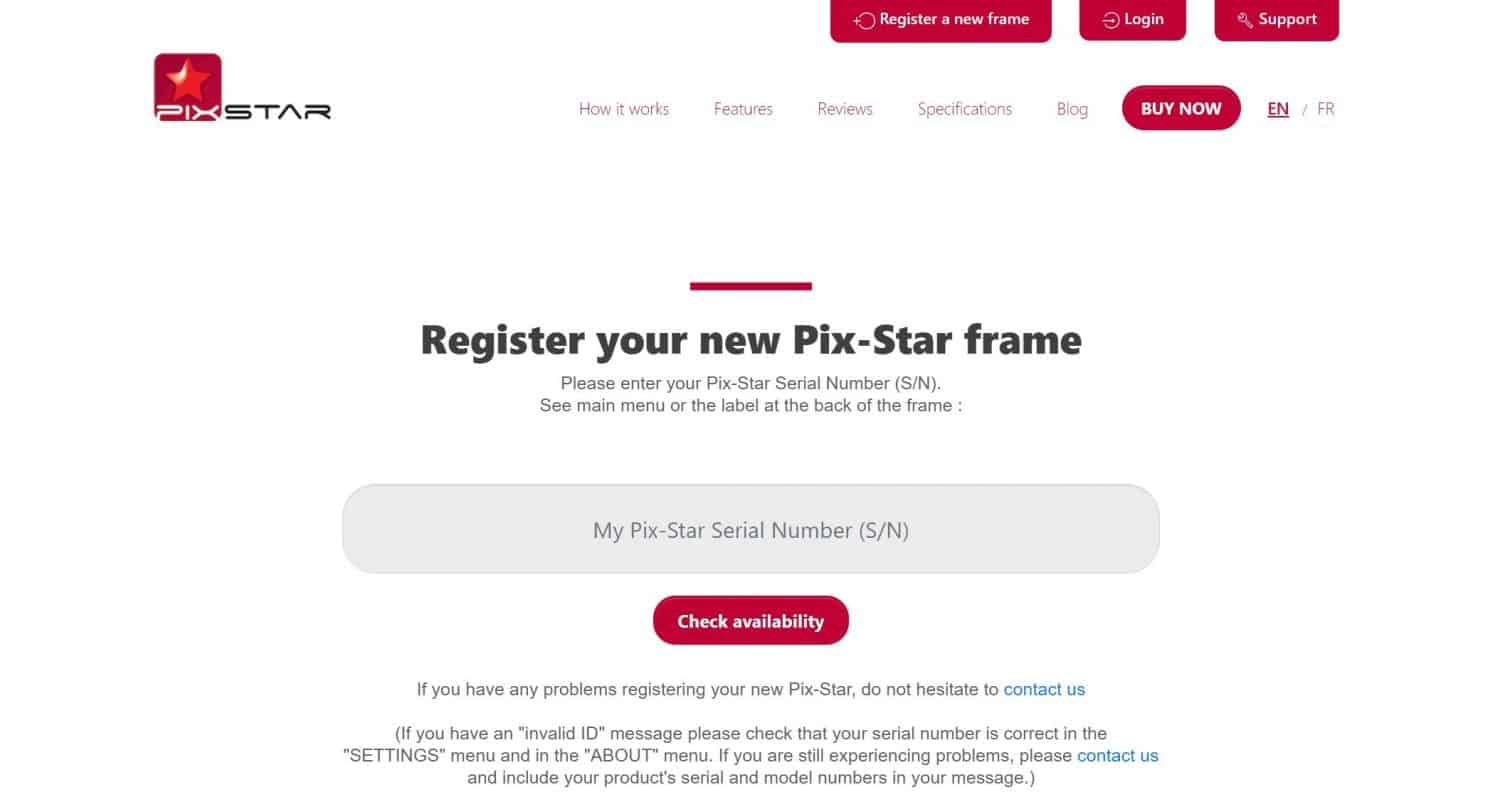
Now that you’re connected to Wi-Fi, head over to pix-star.com on a PC. Click on “Register a new frame” at the top of the screen. Here you will be asked to input the serial number of your Pix-Star frame.
To find the serial number, go back to the “Settings” menu from the home screen, scroll down to “About” and click “ok”. Type the number next to “Serial Number” into the field on your web browser and click “Check availability”. Follow the instruction in your web browser to complete the Pix-Star frame’s registration process. - Download the Pix-Star Snap mobile app
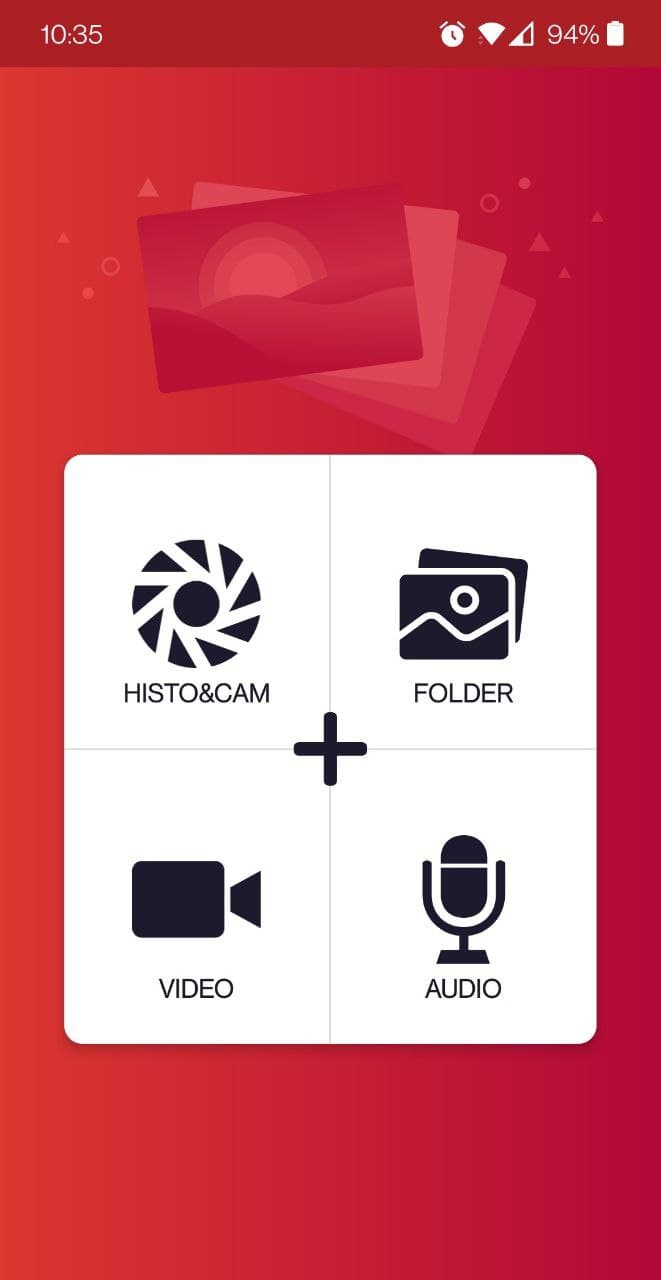
The Pix-Star Snap mobile app lets you send photos, videos, and audio notes to multiple frames at the same time. You can send up to 250 photos at once and only need the receiving frame’s email address. Download the Pix-Star Snap mobile app to your phone or tablet. It’s compatible with both iOS and Android and can be used on either a phone or a tablet.
Once the app has downloaded to your phone, you may have to grant some permissions for the app to work properly. Don’t worry – your data and personal information are extremely safe and protected. These permissions are simply required so that you can select photos to send from your gallery, and to record new videos/photos/audio directly inside the app. You may also be required to grant permission the first time you try to take a picture or send photos from your phone’s gallery. - Send your favorite photos and videos
For an in-depth guide on how to send photos to your Pix-Star frame using the Pix-Star Snap mobile app, read this helpful step-by-step guide. We cover sending photos and other media from both Android and iOS devices.
Sending photos via email is quick and easy. Simply add the photos as attachments and send the email to your frame’s unique email address (found at the bottom of your frame’s home screen). Make sure you add the photos as attachments, don’t drag and drop them into the email body or they won’t send.
Another great method for sending photos to your Pix-Star frame is by USB/SD card. Simply load the photos you want to view on the frame to a USB/SD card. Avoid using cards larger than 64GB as they can sometimes struggle to connect. Insert the USB/SD card into the Pix-Star frame’s relevant port (left side of the frame when facing the display).
The frame will take a moment to register and log the USB/SD card. If you’re playing from an SD card, the plug and play feature lets you view the photos on the card in a slideshow. You don’t need to copy them to the Pix-Star frame’s internal storage first.
You can copy all the photos to your frame. Simply press the “Menu” button on the remote control while viewing the photos from the USB/SD card. Click “Select all” and press the “menu” button again. Click the “Copy selected pictures to…” option and select the folder to copy all the photos to (these folders are all on the frame’s internal storage). - Start a slideshow on the Pix-Star
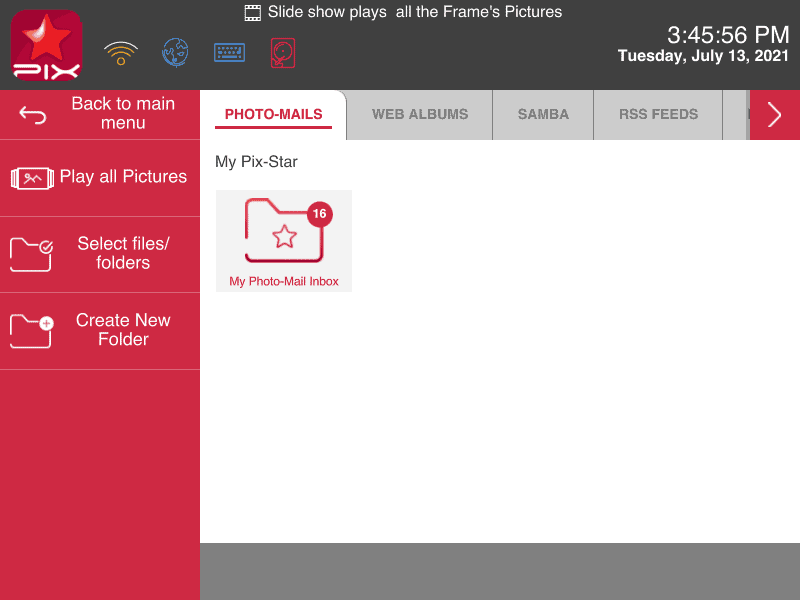
Once you’ve got photos on your frame from either the mobile app or by transferring them to the frame’s internal storage from a USB/SD card, you’re ready to view them in a slideshow. From the main menu, simply select the “Play all the frame’s pictures” tab and press “ok”. This will start a slideshow containing all the photos saved to your frame’s internal storage. It also includes web albums and photos imported from external sources.
If you want to start a slideshow using only the media in a specific folder, choose the “My pictures, videos & messages” option from the home screen. Here you can browse through the folders of photos received from different sources and choose which one you want to include in a slideshow.
Most photos will show up in either the “Pix-Star” or “Web Albums” tab at the top of the display. Use the “Select files/folders” option in the left-hand panel to manually select which folders and photos to include in the slideshow. Click “Play selected files” to start a slideshow with them. - Adjust slideshow settings on-the-go
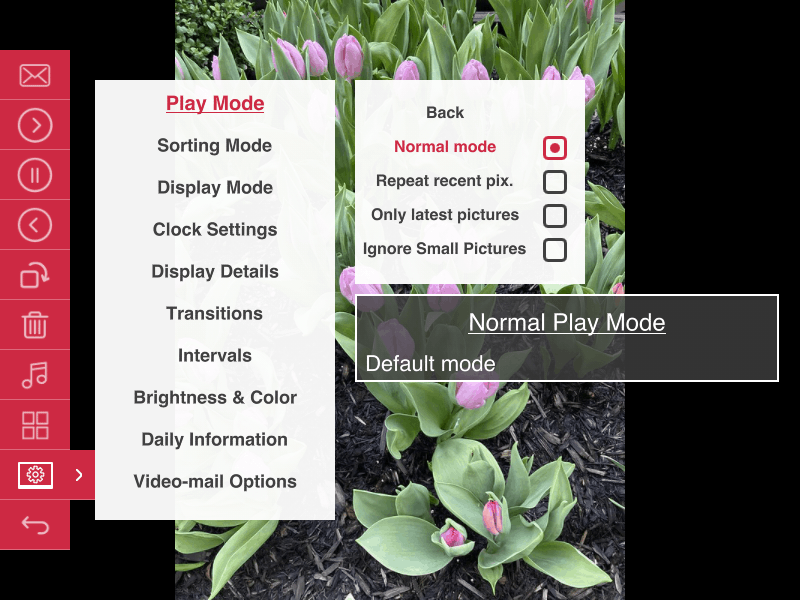
One great feature of Pix-Star frames is their ability to adjust slideshow settings without needing to leave the slideshow. While you’re in a slideshow, press the “Menu” button on the remote control (three horizontal lines with bullet points on the left). Here you have various options like rotating photos, deleting a photo, playing a song over the slideshow, etc.
Scroll down to and select the “Slideshow options” setting and press “ok”. Here you can adjust tons of different settings to do with the slideshow speed, style, transition, play order & frequency, brightness & color, and more! Take some time to get familiar with the settings and test them out to see what setup works best for your frame, family, and home. - Share precious moments with your loved ones!

Now that you know how to use a digital photo frame the right way, you’re ready to get started. We’ve learned how to connect to Wi-Fi, register your Pix-Star frame, send photos via the mobile app and by USB/SD card, start slideshows, and adjust settings on the go.
While this isn’t an exhaustive look at every setting that the frame offers, it’s a fantastic place to start. You can take some time to explore the web interface & dashboard (where you registered your frame), and test out some of the mobile app’s features and functions. You’ll be used to it in no time! Enjoy stress-free sharing for your favorite and most precious memories with your loved ones!